In my previous post, I had explained how I set up an N100 mini PC as an OPNsense firewall in my home network. One of the main purposes of having such a firewall was to (transparently) redirect all outgoing DNS requests to the local Pi-hole instance.
I have a Pi-hole instance serving DHCP and DNS in my LAN and most client devices respect the DNS settings provided by the DHCP server. But Android devices (I have an Android TV at home) ignore it and choose to use the Google DNS servers instead. So I need this redirect in place to have network-level ad-blocking working.
Pi-hole logo
In the previous firewalls and gateway devices, I had to set up a DNAT rule to redirect all outgoing traffic to port 53 except for the traffic originating from the Pi-hole instance to the Pi-hole instance’s address on port 53. To prevent “unexpected source” errors that can happen after adding the DNAT rule, I had to enable masquerading the redirected packets to have the firewall/gateway device’s IP address as the source IP address using SNAT.
Now OPNsense is built on top of FreeBSD, which has its own pf firewall and that works differently from the Linux iptables firewall. So this is what I had to do to get the DNS redirect working.
I started with a fresh installation of OPNsense. So ymmv, if you start with some existing configuration. I enabled the ‘Automatic outbound NAT for Reflection’ option in Firewall > Settings > Advanced. This is necessary for the automatic masquerading of the source address while performing the redirect, since the default for outbound NAT in OPNsense is ‘Automatic outbound NAT rule generation (no manual rules can be used)’.
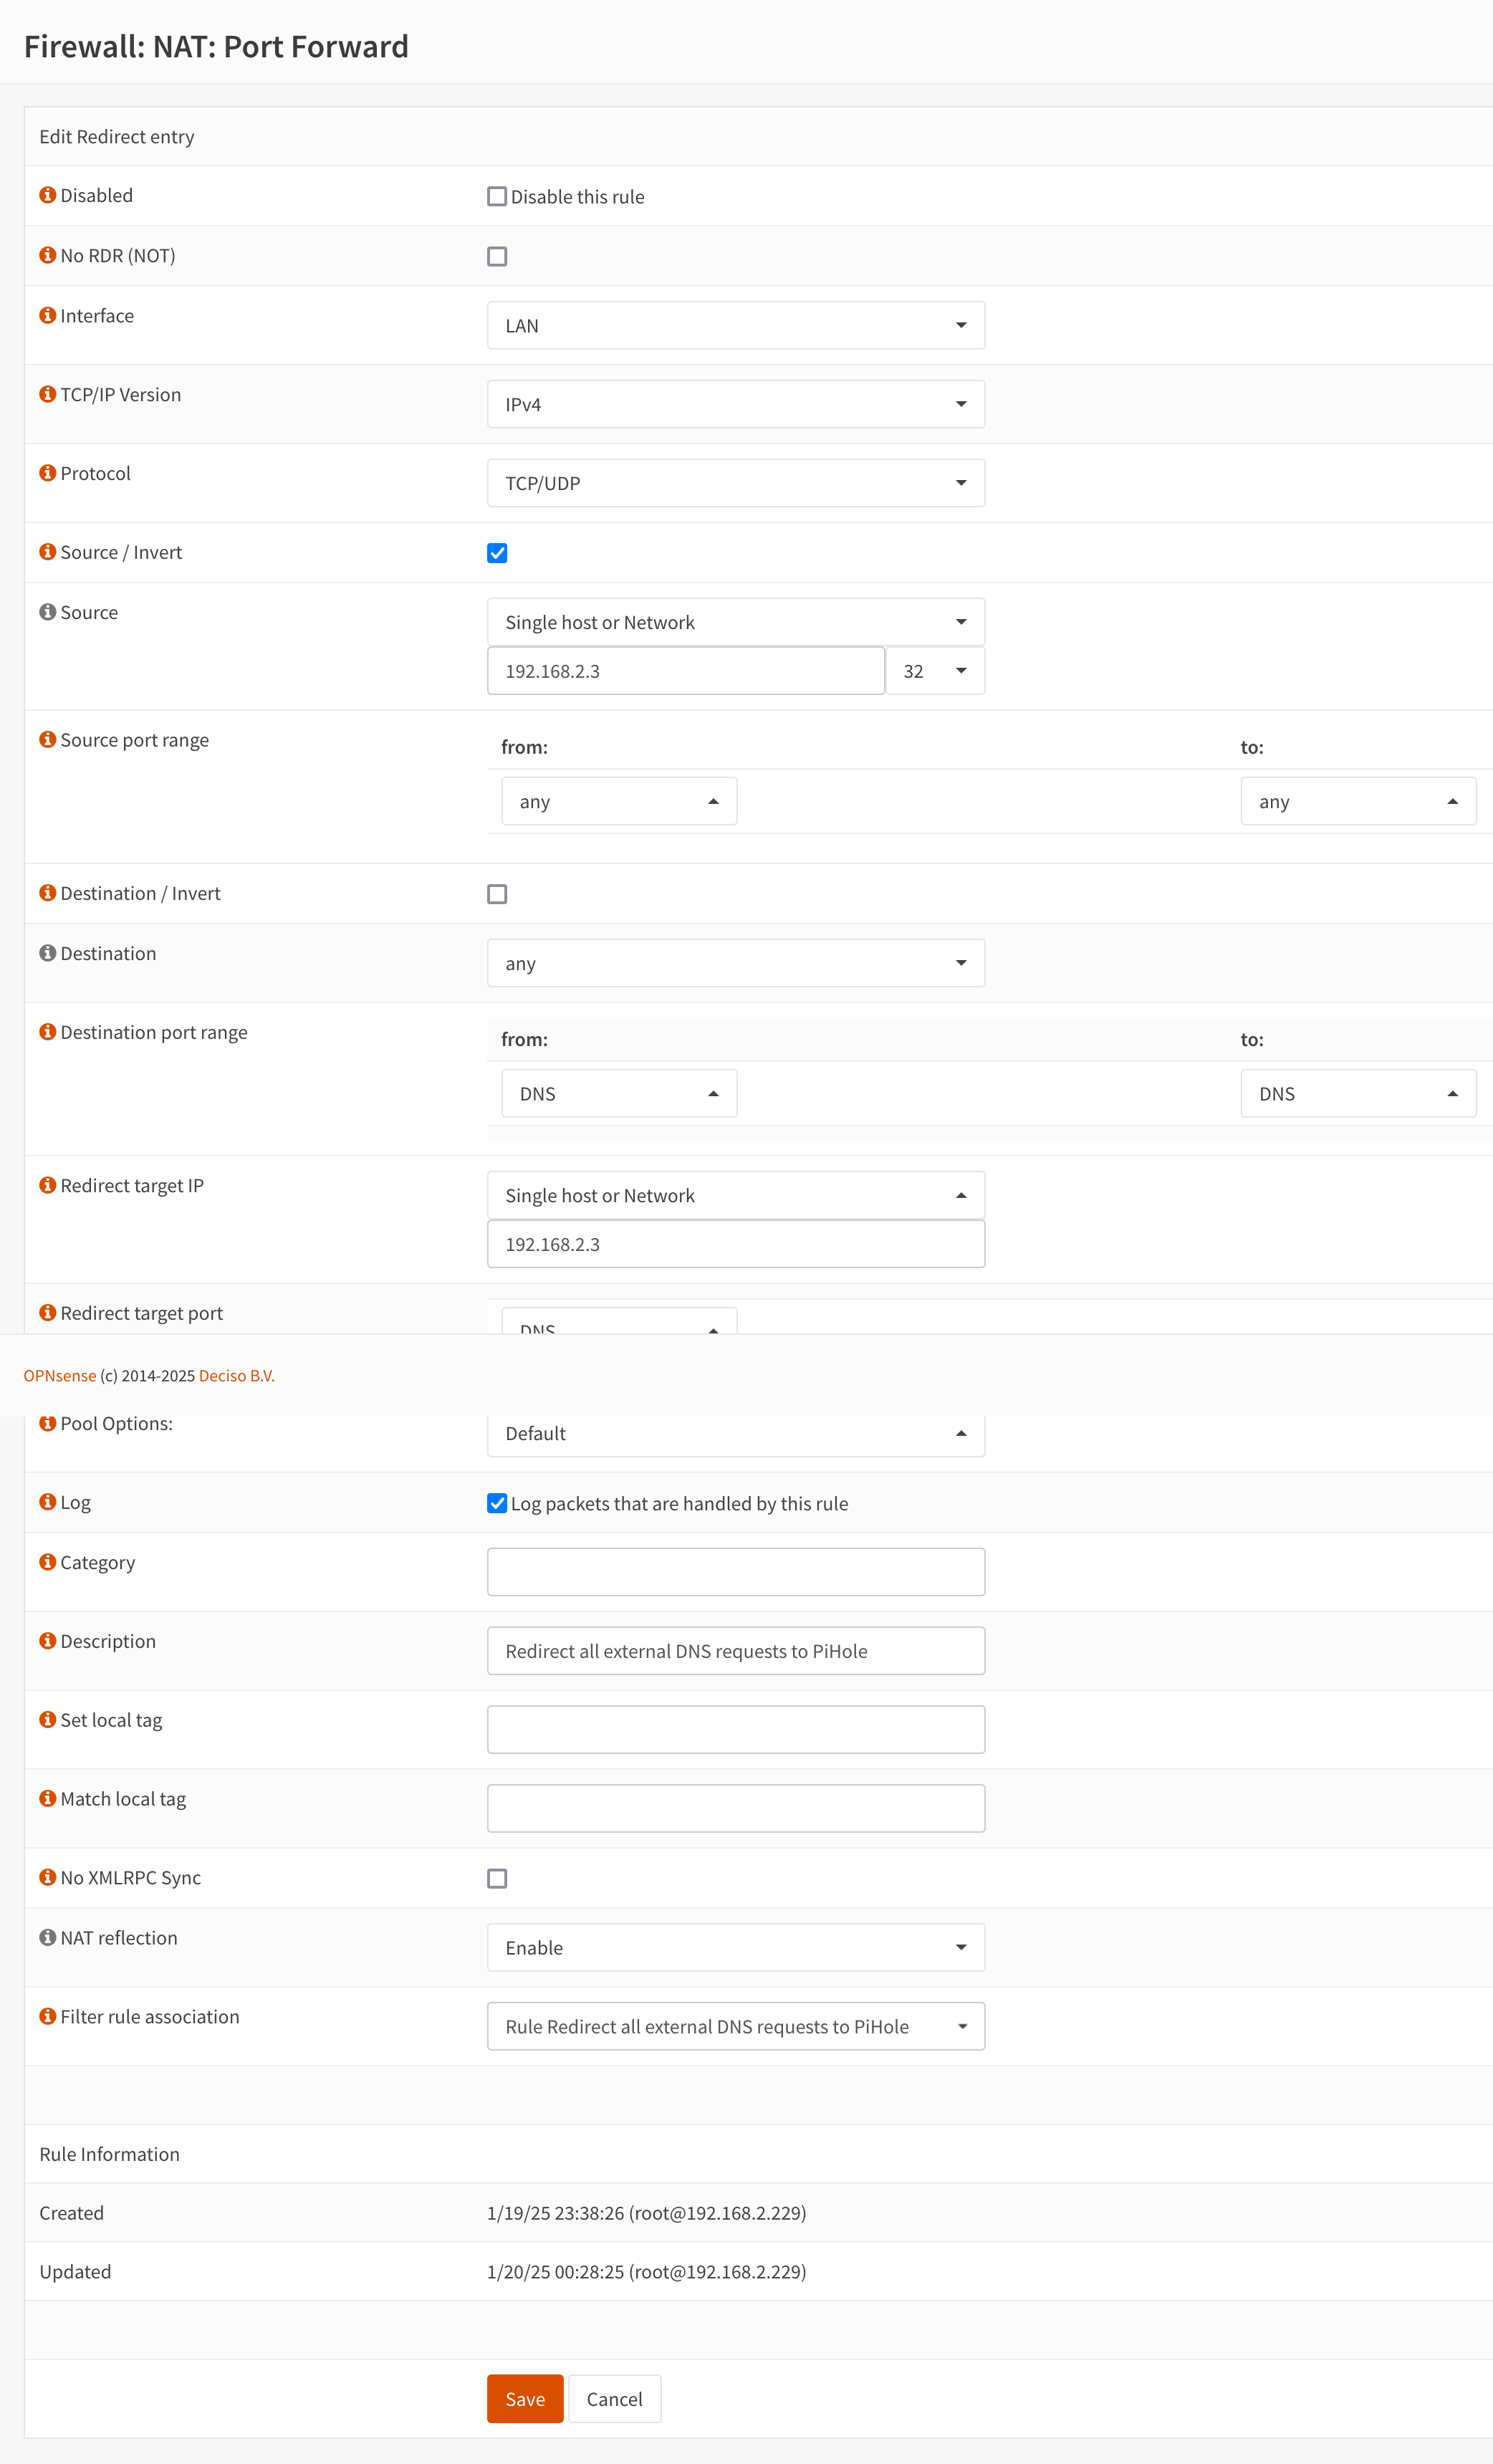
Then I went to Firewall > NAT > Port Forward and clicked on the + icon to add a new rule that looks like the below screenshot.
Add a port forward rule
Here are the relevant settings that I changed before saving the rule.
Interface: LAN
TCP/IP Version: IPv4
Protocol: TCP/UDP
Source/Invert: (checked)
Source: Single host or Network, 192.168.2.3/32 (this is the IP address of my Pi-hole instance)
Redirect target port: DNS (I apologize for the screenshot partially hiding this)
Description: Redirect all external DNS requests to PiHole
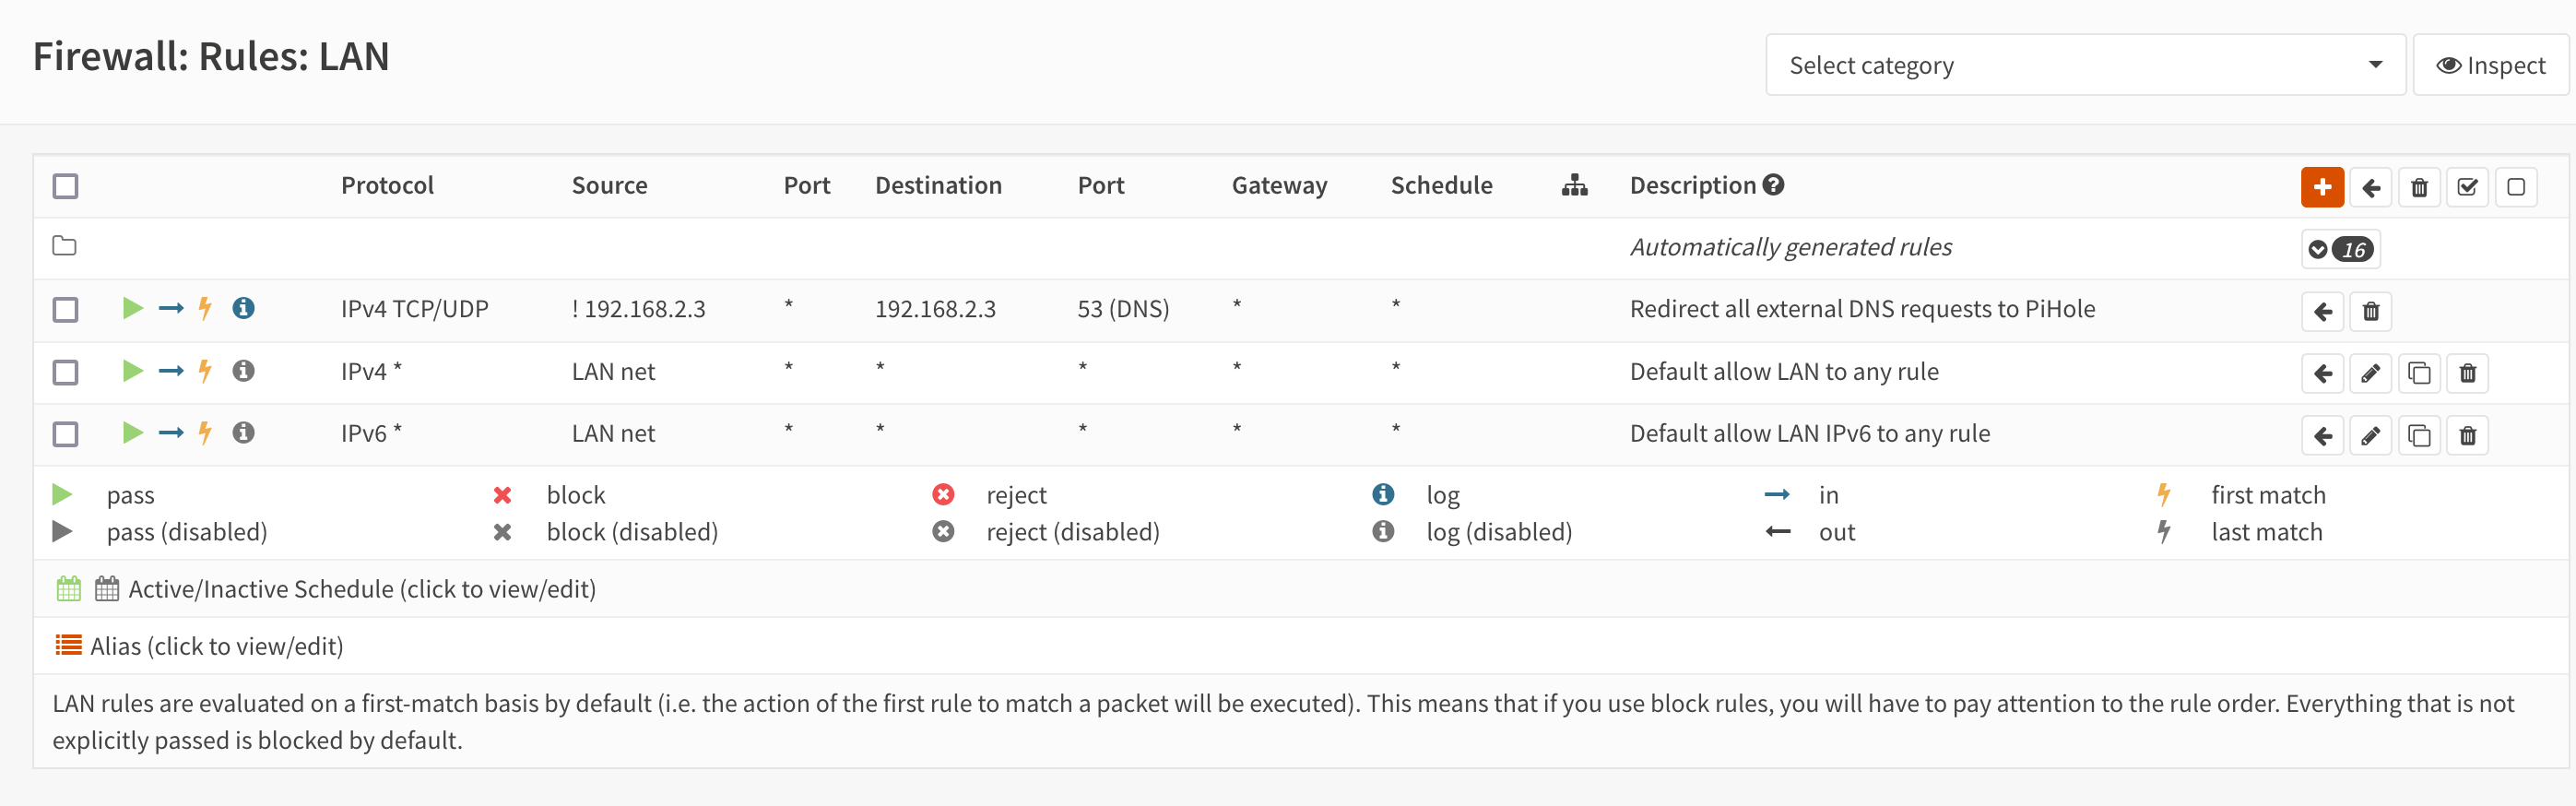
Then I went to the Firewall > Rules > LAN page and moved the custom associated filter rule to the top of the rule list so that it looks similar to the below screenshot.
Associated firewall rule moved to the top of the rule list
Now, when I queried the DNS record for a domain using dig, it got a response from my Pi-hole instance. When I queried Google DNS for a blocked-in-my-Pi-hole domain using a command like dig blocked-domain.com @8.8.8.8, it got redirected to the Pi-hole DNS server and received a 0.0.0.0 address in the response as if it was from the Google DNS resolver, 8.8.8.8. So it all worked! 🎉
Bonus reading:https://labzilla.io/blog/force-dns-pihole. This talks about doing a similar thing using pfSense, which OPNsense is a fork of and has slightly different rules starting from a different baseline to achieve a similar result. It also explains a way to block all outgoing DNS-over-HTTPS (DoH) using pfSense. The linked Hacker News thread also has insightful comments on this topic.
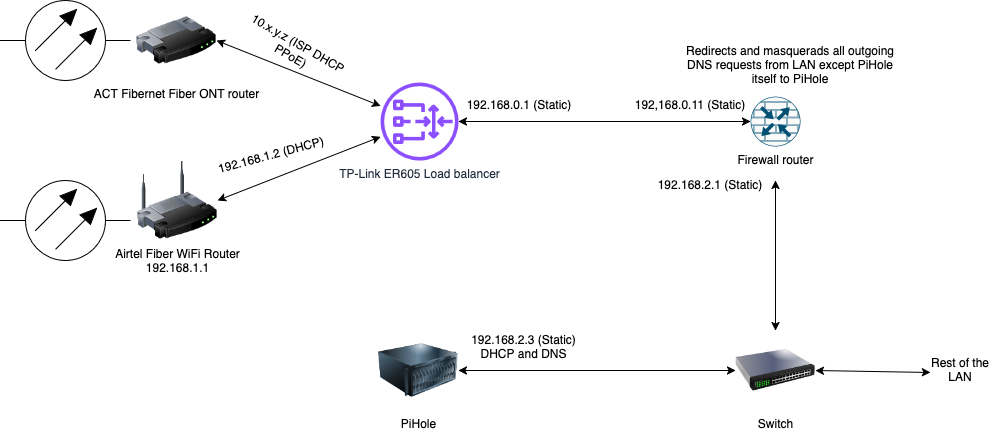
I have been working remotely for the past 6+ years, and my wife has been working remotely for the past few years. So we have 2 internet connections at our home, with one configured as a primary and the other as a backup on the TP-Link ER605 load balancer. The load balancer is configured to fail over automatically to the backup connection when the primary connection goes down.
In our home, we have run Ethernet cables through the walls and provided one port in each of the rooms and living rooms. All these cables terminate at a central location in the hub in a switch and then go through a firewall router to the load balancer and to the internet. The high-level view of this setup looks like the following diagram.
A high-level diagram of my home network and how it connects to the internet
As shown in the above diagram, I also have a Pi-hole instance that acts as the DHCP and DNS server for my home LAN. It works well to provide network-level ad-blocking services for all devices in the LAN. However, some devices, Android devices in particular, often ignore the DNS server provided by DHCP and use the hard-coded Google DNS instead, bypassing ad-blocking. Even that is okay in many cases, except a few. We have a Sony X90H smart television that runs the Android TV operating system. Without network-level ad-blocking, it shows a lot of non-dismissible advertisements for content from apps that we haven’t installed or used. So I have always used a firewall device of some sort to force the usage of Pi-hole as the DNS server in my LAN. I have done this in the past with a Netgear Nighthawk R7000 router running the FreshTomato firmware, a Seeed Studio reRouter, and a GL.iNet Beryl AX travel router since last evening.
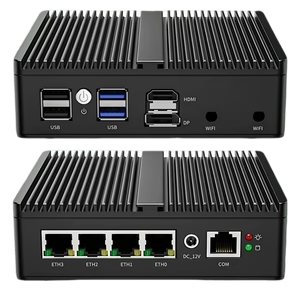
Speaking of that, the reRouter device, which I have used for 2+ years now, has been crashing and boot-looping frequently in the past few months and causing internet disconnections. I have been planning to replace that with a more reliable and powerful x86 mini-PC with OPNsense on it. I ordered the Skullsaints Onyx Intel 12th Gen N100 Mini PC last night for this new project. This was an easy choice since I have been hearing good things about N100 mini PCs on the Late Night Linux family of podcasts. While I waited for the delivery, I set up the GL.iNet Beryl AX travel router as a stop-gap replacement.
Skullsaints Onyx Mini PC
I bought this specific product because it has 4 2.5G Ethernet ports, which would allow me to do internet load balancing too in the future and simplify my networking setup. It came with a no-name brand 256 GB M.2 NVMe SSD preloaded with Windows 11 Pro and 8 GB of RAM. As I had read reviews about this device heating up due to lack of/dried thermal paste, I checked and confirmed that the thermal paste was intact.
Then I downloaded the latest OPNsense image, dd‘ed it to a USB flash drive and installed it on this device. Then I opened up the OPNsense web interface and went through the setup wizard to configure the firewall. When I installed it in place of my previous firewall, nothing worked and I had no idea why. I took help from the friendly folks on the #OPNsense IRC channel on libera.chat to correct my mistakes and get the configuration working the way I wanted it to. Below are the details of how I did it.
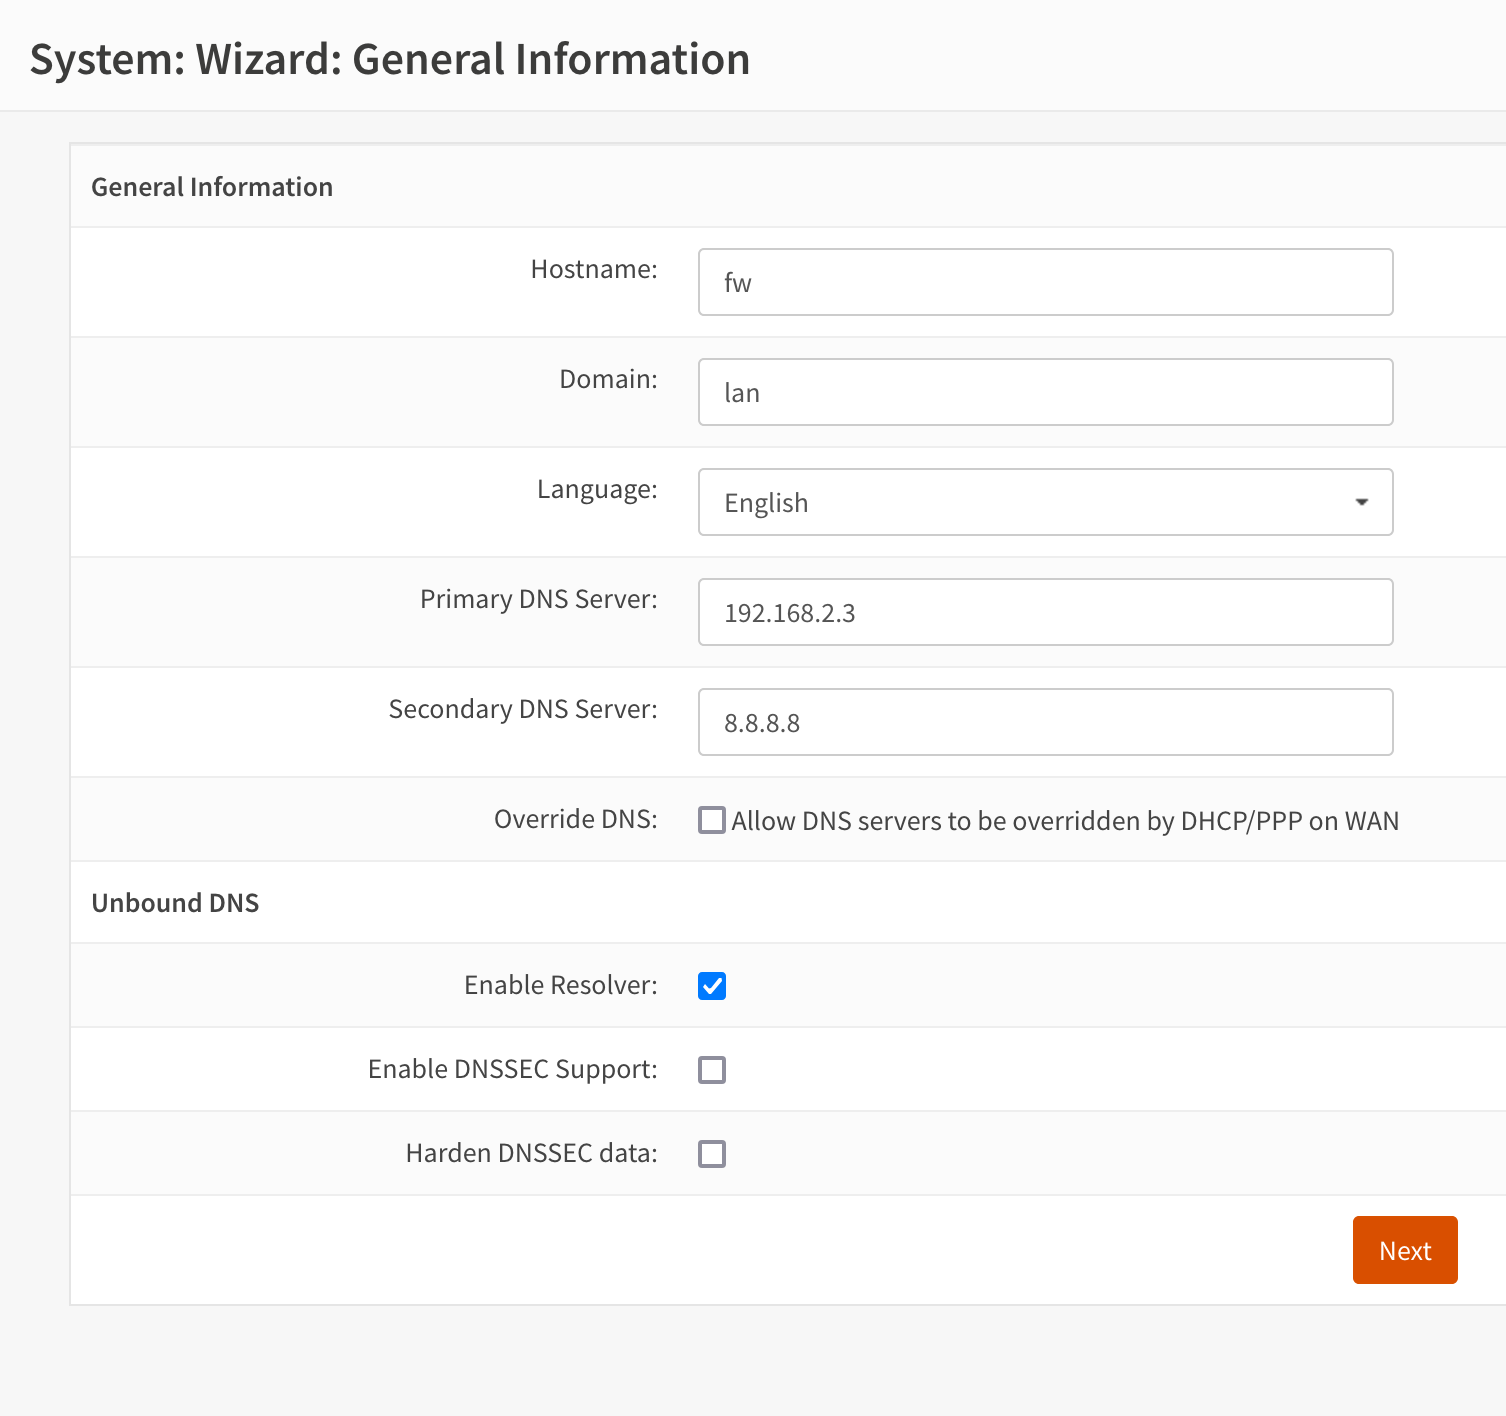
General System Information configuration
In the above page, I configured the hostname, domain and the DNS servers used by OPNsense. I specified 192.168.2.3, the IP address of my Pi-hole instance, as the primary DNS server and added the Google DNS address as the secondary. Even though it wasn’t necessary, I left the built-in Unbound resolver enabled.
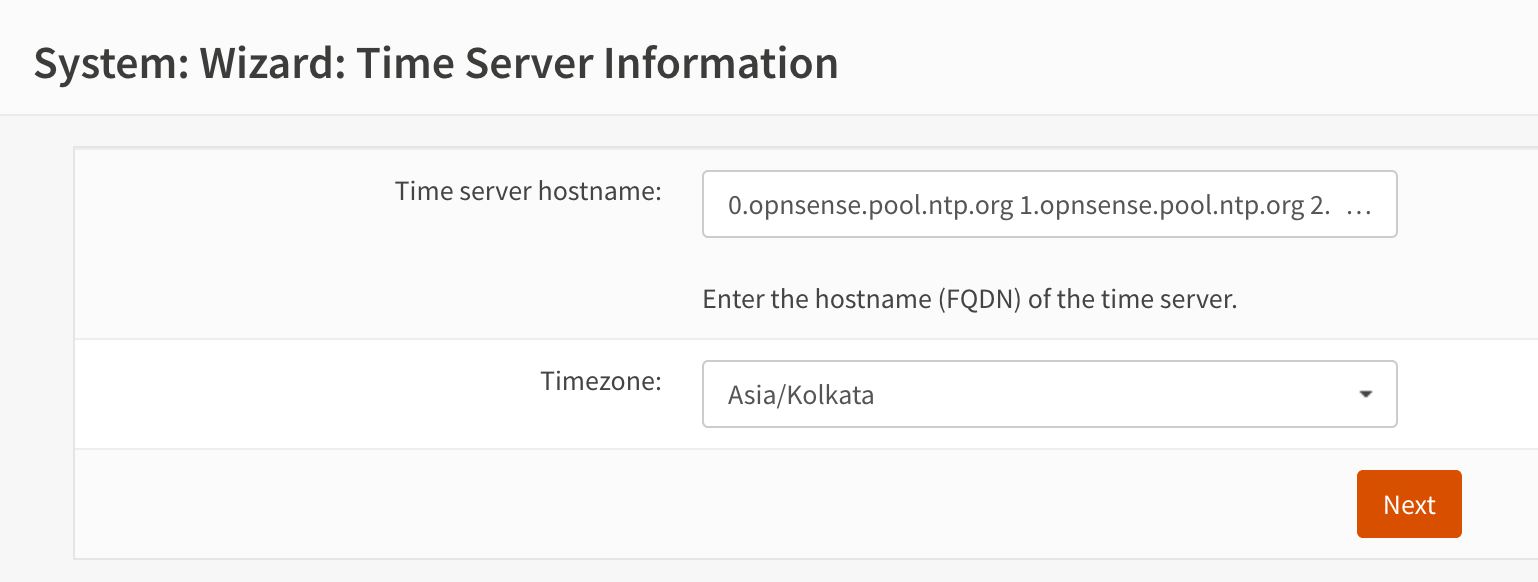
Time Server configuration
I configured my timezone in this page.
WAN interface configuration
This page had a lot of options for configuring the WAN interface (I will need to revisit these when doing the multi-WAN load balancer setup in the future). I set up a static IP for the WAN interface in the 192.168.0.0/24 subnet, since that is what I had used in the previous setup. I also disabled the blocks for accessing RFC1918 networks and bogon networks (this was not necessary) from the WAN-side, since this device doesn’t directly connect to the internet.
LAN interface configuration
In this page, I configured the LAN interface address to be the same as what I had in the previous setup. In the following page, I configured the root password and completed the wizard to apply the configured changes. With this setup, I had a working router between my LAN and the load balancer.
Since the metal top of the mini PC’s case acts as a passive heat sink, I could feel it getting very hot even though the OPNsense thermal sensors showed a low, static temperature. I will monitor this in the coming days to make sure that there are no thermal issues.
After listening to a lot of grandma stories when I was very young, I started reading story books, in English and Tamil, during my school days. I always looked forward to long train journeys because I could request my father to buy me some books and Tinkle comics from Higginbothams to read during the travel. In a few years, I moved on to reading books from authors like J. K. Rowling, Dan Brown, Stieg Larsson etc. and enjoyed that a lot. This continued through my college days and then somehow after I got my first job, I lost that habit. ☹️
Perhaps, my love for computers, gadgets, and gaming distracted me, or I spent all my spare time wooing the love of my life, I do not know. While I have read a book or two once in a while, mostly non-fiction ones that interested me, I couldn’t get back into my habit of reading books regularly.
A few years ago, I had read good reviews about Brandon Sanderson’s Mistborn saga and started reading the first book a couple of times but lost interest very quickly. This wasn’t because of the book’s content, but more due to getting distracted by other, “more interesting” things.
Around 2015, I started listening to podcasts during my long commute to and from work and loved that experience so much that I have continued to do so till now even though I don’t have any daily commutes anymore. So I decided to channel that into listening to audiobooks to see if that sticks as a habit.
I started listening to the Mistborn saga audiobooks and surprisingly, it stuck! I kept coming back to it regularly enough to be able to finish listening to the trilogy in 2 months or so. Listening to podcasts during dinner time was often replaced with long audiobook sessions during the same time. Even when there were some gaps, I came back to it within the next day or two. On a few days, I even ended up listening for long hours because I was interested in seeing the stories progress. I have to thank Michael Kramer, who narrated all the books, for keeping things lively throughout.
Cover images of the Mistborn trilogy books
As for the Mistborn trilogy itself, it had a decent plot and the execution was decent, considering that these were some of Brandon Sanderson’s earliest books. While there were enough plot points that kept the listener hooked through parts of the books, I couldn’t help noticing how most of what happened in each book barely mattered at the book’s/trilogy’s ending.
Even though I noticed and realized that audiobooks are a very inefficient way to consume content at a glacial pace (relative to reading), it was still better than not reading books at all.
Here’s to reading and listening to more books in the coming years! 🤞
2024 has been a good year for me and my family, and I wanted to share some highlights from it.
Personal life
Keirthana and I had our tenth wedding anniversary ❤️ at the beginning of this year (we have known each other for more than 32 years now!) and celebrated it with a trip to Murudeshwara (a long train journey that we enjoyed) where our daughter had her first beach experience.
Statue of Lord Shiva, Murudeshwara
Our daughter also had her first flight, and her first international trip (to Singapore) along with my cousin who had his firsts too. A day trip to the Universal Studios at Sentosa was a highlight of this trip.
Shrek Castle at Universal Studios, Sentosa, Singapore
We also had a memorable trip to Jaipur with family while presenting at the UbuCon Asia 2024 event held there. More details about that later.
A beloved family member passed away in the middle of this year, causing a mix of sorrow and relief to the bereaved.
Towards the end of the year, we managed to achieve some longstanding financial goals, which should stand us in good stead for the future.
While there were some challenges throughout the year, we are grateful to have been in a position to deal with them well. 🙏
Work
I continue to work in the awesome Launchpad team at Canonical, and we have been doing a great job so far in coping with the departures of legendary colleagues (Colin and William), and the team growth has helped with it. This has given me a valuable opportunity to grow and provide leadership in specific areas (infrastructure, overall system design etc.) within the team, and I am grateful for that.
At the beginning of this year, Keirthana and I had a stressful time when we had to assess our options and decide not to travel to the Canonical engineering sprint at Madrid in May. As a Real Madrid, I was really looking forward to going to Madrid, visit the iconic Santiago Bernabéu stadium, and possibly attend a Real Madrid game. 💔 But this tough decision had to be made due to a lack of reasonable childcare options for our daughter during our work trip. We were able to travel to The Hague for the second engineering sprint in October and also attend the Ubuntu Summit 2024.
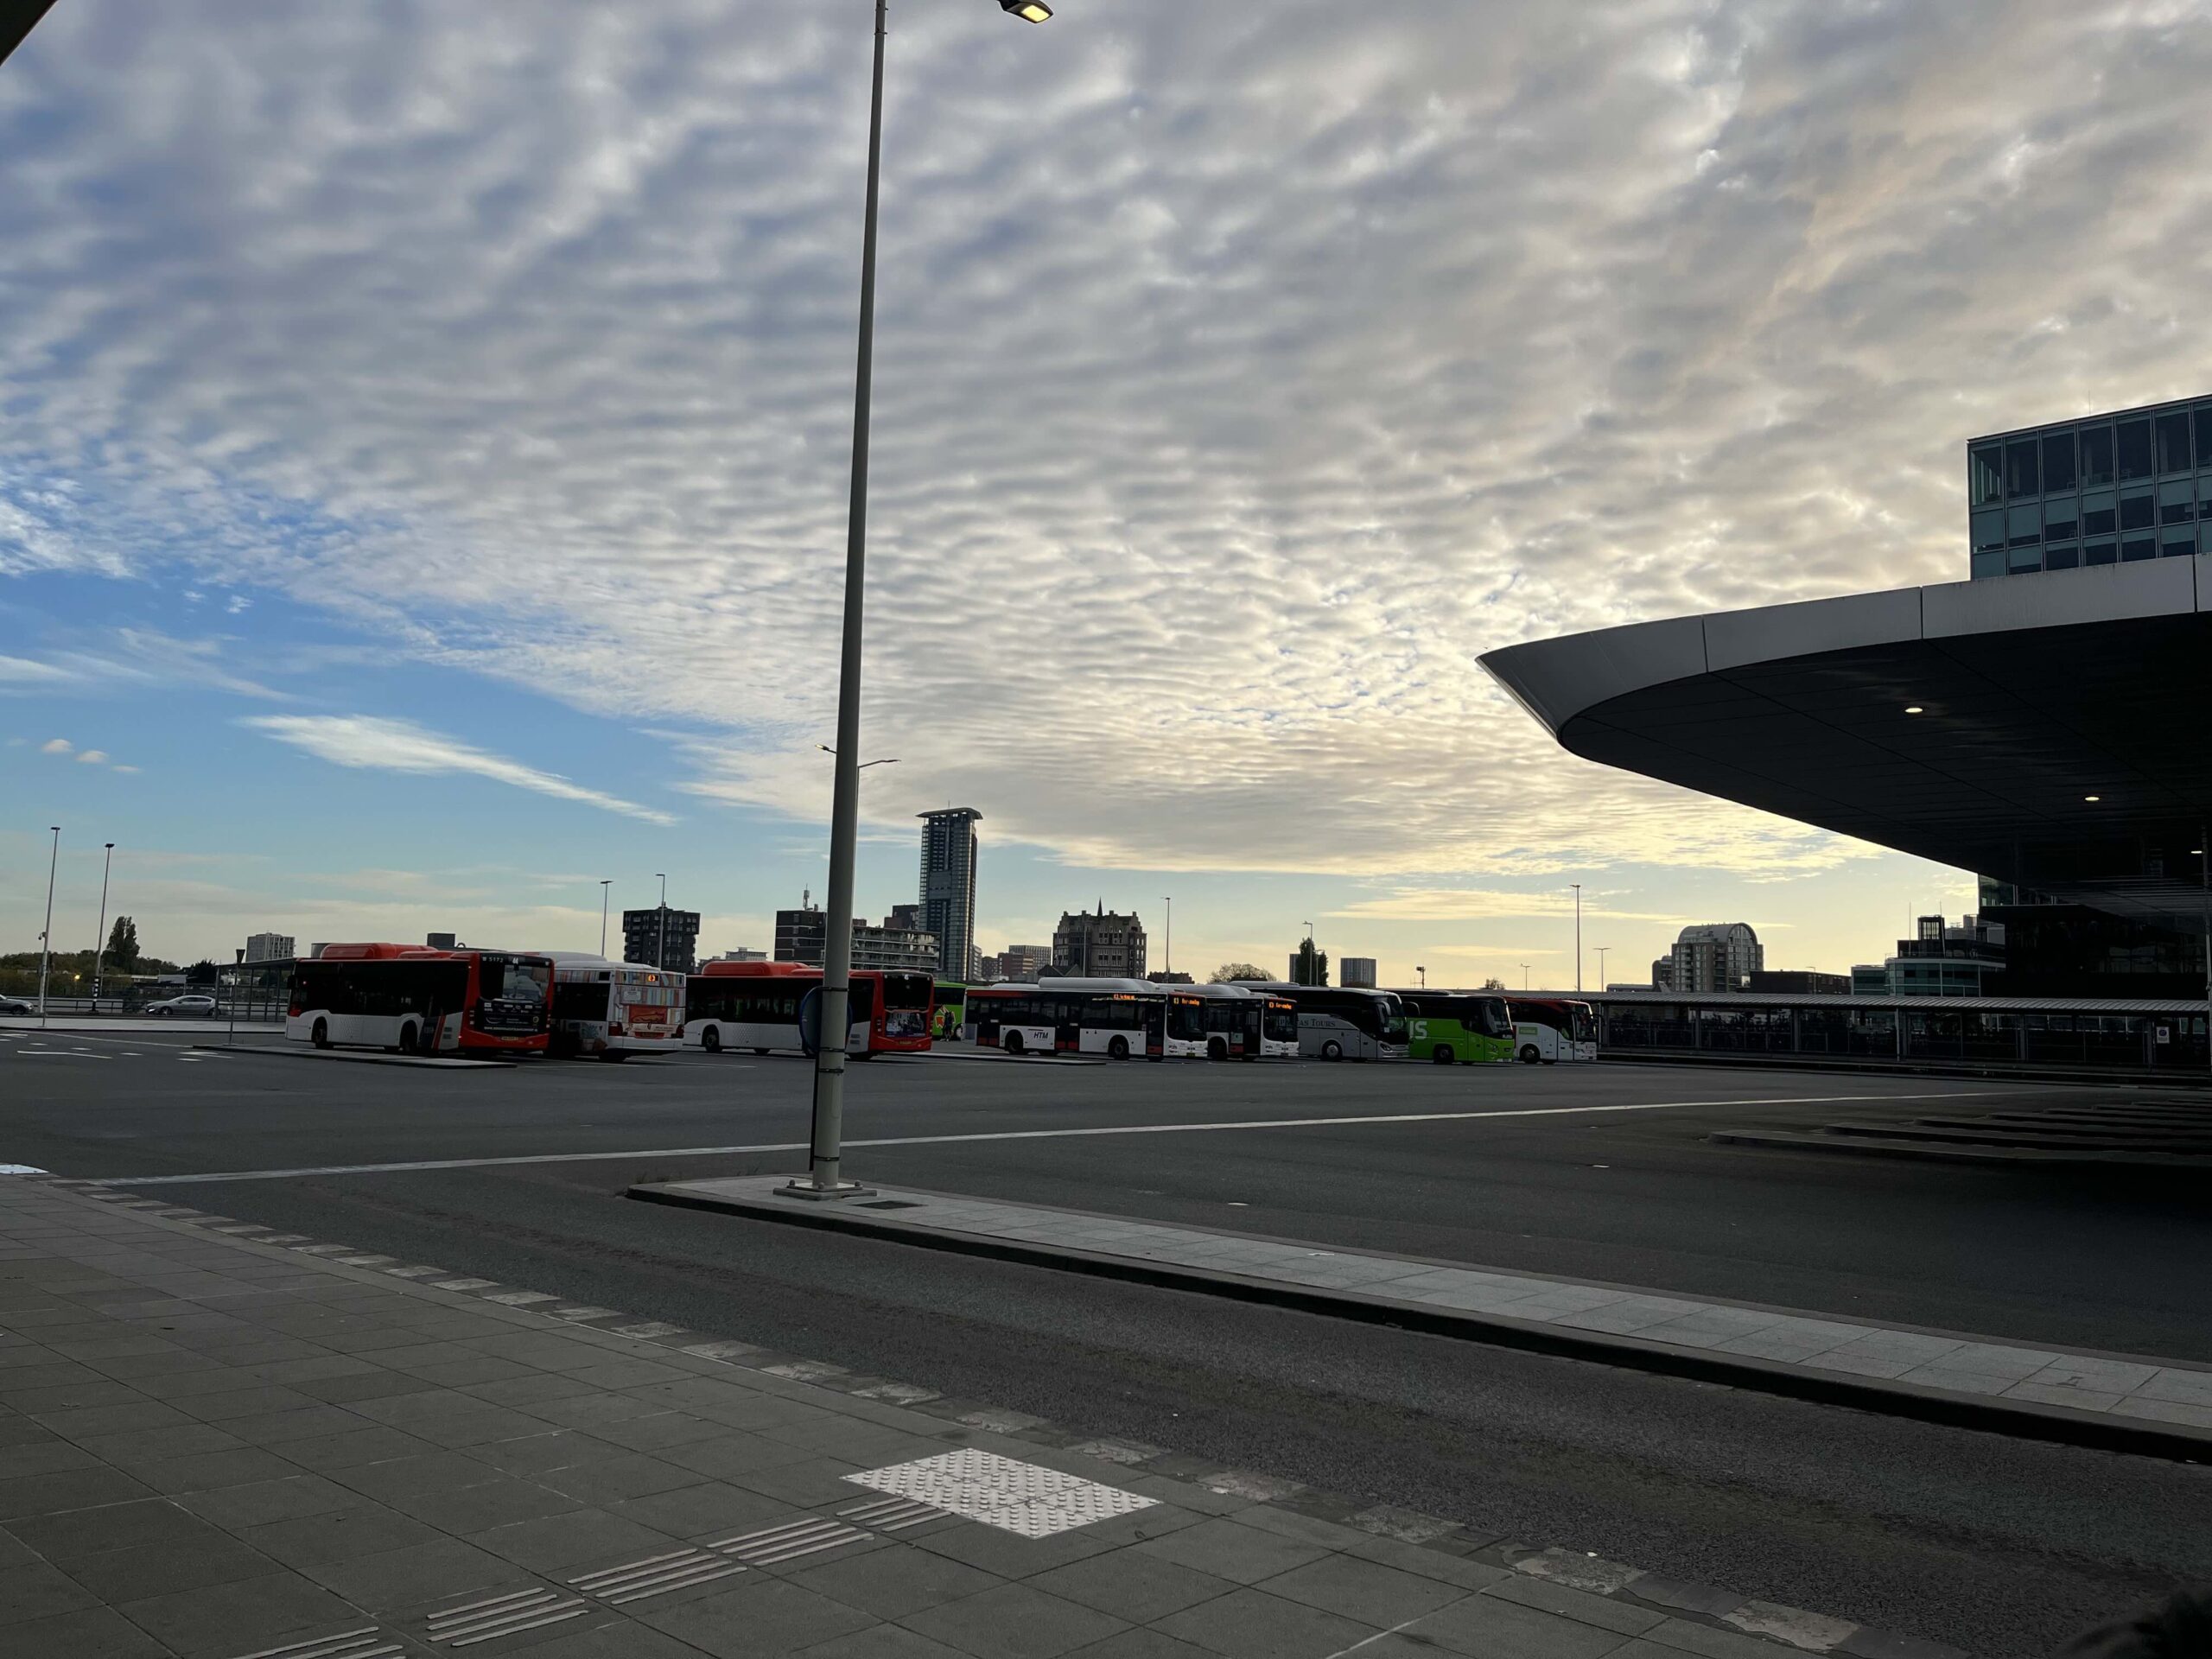
A snap taken at the Den Haag Centraal Bus StopUbuntu Summit 2024 logo
During the summit, I had the chance to meet and thank some inspirational people from the Linux ecosystem (Mathieu Comandon from the Lutris project, GloriousEggroll of Proton GE, Nobara fame, Neal Gompa, a prolific contributor to Linux distributions and a fixture in many of my favorite Linux podcasts), ex-colleagues, and friends (Soumyadeep Ghosh). I loved the Matrix 2.0 talk by Mathew Hodgson and the lightning talk by Nirav Patel from Framework where he successfully switched the Mainboard of a Framework laptop from x86 to RISC-V during the talk was mind-blowing!
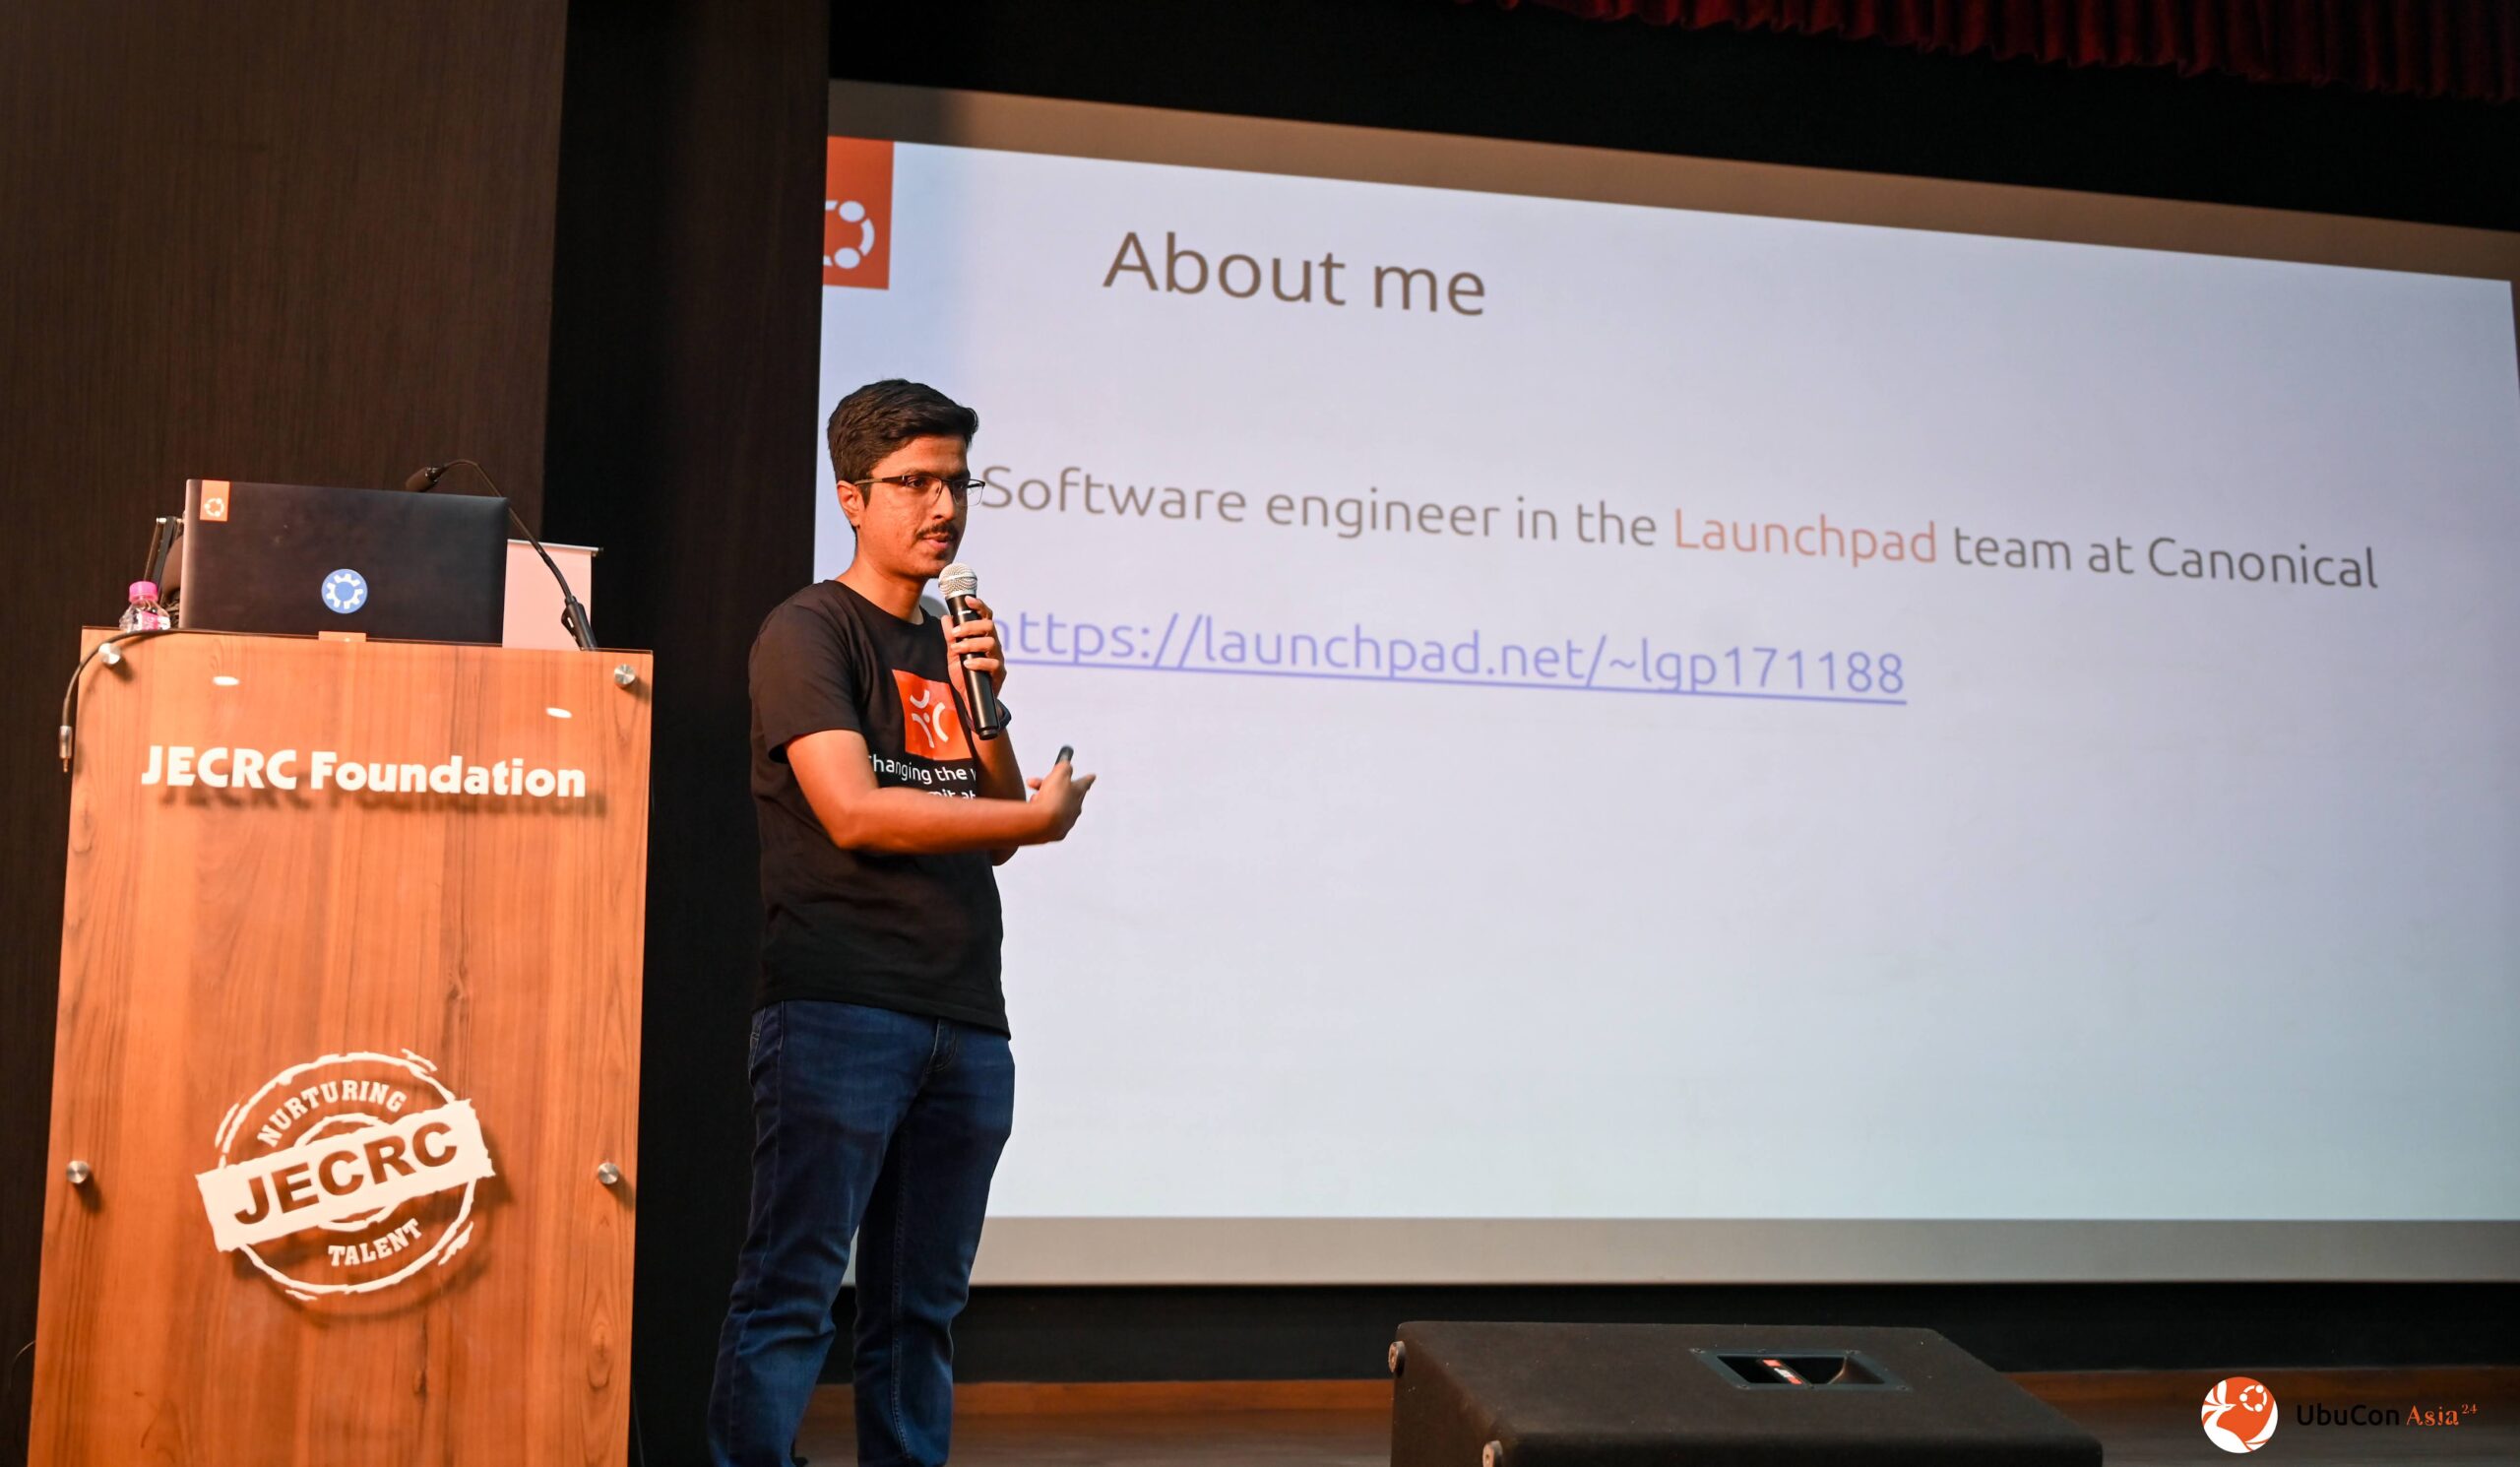
Keirthana and I presented talks at the UbuCon Asia 2024 at Jaipur in September. My talk was about ‘6 little-known features: How to make the most out of Launchpad’ and it was well-received by an audience containing a mix of many students very new to Linux and some seasoned, veteran community members.
A snap from my talk
During this event, I met Soumyadeep Ghosh, a still-in-college prodigy doing great work in the Ubuntu, Snap, KDE, and the open source software communities, and gained a new friend!
I started learning Golang this year and have used it to build some toy personal projects so far. Python has spoiled me so much that I find it very difficult to pick up a new programming language. After relying on the ‘batteries included’ approach of Python and its standard library, I find the ‘So what if it is not there in Golang? We can easily implement it ourselves’ attitude of developers using Golang, very hard to accept. But this ‘learn, unlearn, and relearn’ process is very important for me to master, and so I will continue learning Golang in 2025.
Hobbies
Self-hosting
I built my first homeserver (code-named, tesseract, because of the cubic shape of the Fractal Design Node 804 case that I used for the build) at the beginning of this year and moved all the local self-hosted services from the 2 Raspberry Pi 4s to it. I run Ubuntu 24.04 on this server with multiple ZFS pools having plenty of storage. Even though I have known about ZFS for a very long time (right from my college days as a Sun Microsystems Campus Ambassador in 2008), I am grateful to the 2.5 Admins podcast (Jim Salter and Allan Jude, in particular) for evangelizing ZFS and nudging me to use it! I plan to convert all my computers to use ZFS, with tesseract acting as a zfs send backup target, soon.
Gaming
I continued to wade through my ever-growing backlog of video games this year, and managed to finish many more games this year than the averages from the previous years. You can see my posts about these games in this Mastodon thread. Here is a list of the games that I played and completed this year.
Venba (Xbox Series X)
Lovers in a dangerous spacetime (Steam)
Spiderman 2 (PlayStation 5)
Trine 3 (Steam)
Cyberpunk 2077 Phantom Liberty (Steam)
Super Mario Odyssey (Nintendo Switch)
My Friend Peppa Pig (Xbox Series X) — I played this for/with my daughter, who is a big Peppa Pig fan
Journey (PlayStation 5)
Operation Tango (PlayStation 5 + Steam)
Trine 4 (Steam)
Astro Bot (PlayStation 5)
Plucky Squire (PlayStation 5)
Trine 5 (Steam)
We Were Here (Steam)
We Were Here Too (Steam)
Marvel’s Midnight Suns (PlayStation 5)
It takes two (Steam, 2nd playthrough, this time as May)
SteamWorld Dig 2 (Steam)
As you can see, most of the above games have cooperative gameplay of some sort and that is what I have enjoyed the most this year, playing with my cousins during weekend nights. Astro Bot (I preordered it) was my best game of this year and I enjoyed every moment of it and got the Platinum trophy at the end.
Astro Bot game cover image
I attempted emulating my Nintendo Switch games using Yuzu (RIP!) before Nintendo took it down and then came back to stop all development on Ryujinx too. I swore off Nintendo due to this, but I suspect I will buy their games and consoles in the future because they do make excellent games! ☹️
I had an on and off relationship with my Steam Deck and played some games on it, without completing anything meaningful. SteamWorld Dig 2, Dave the diver, Cult of the Lamb, Borderlands 2, Yakuza 0, and Psychonauts 2 are some honorable mentions. You can find more details about it in my Steam Replay 2024 showcase.
I bought game discs/cartridges for Marvel’s Midnight Suns, Metaphor: Refantazio (I loved playing Persona 5 Royal), and The Legend of Zelda: Echoes of Wisdom during my international trips, and I am yet to play the last two.
Gadgets
I bought myself an Aorus FO32U2P 32-inch 4K 240 Hz QD-OLED monitor to add to my existing BenQ EW3270U 32-inch 4K monitor, and it has been great to use so far. Since there isn’t a GPU that can run most of my favorite games at 4K 240 Hz, I will have to wait for a future GPU upgrade to be able to use the full power of this monitor. I chose this over the cheaper Alienware AW3225QF monitor because this doesn’t have a curved display and has more productivity features than AW3225QF. I still need to iron out some issues/limitations with my current setup to make the best use of it.
Aorus FO32U2P monitor
Ever since Apple released the M-series MacBooks a few years ago, with trailblazing compute power and battery life, I have been interested in buying one and running Asahi Linux. So this June, I bit the bullet and bought myself an M3 MacBook Pro laptop with the M3 Pro chip, 18 GB RAM, and 512 GB storage. While the Asahi Linux project doesn’t support it yet, I am happy to wait and use macOS till then. I have been using it as an “on-the-bed laptop for personal projects and entertainment” device so far, and have written this post on it.
Furthermore, I bought 3 more TP-Link Deco XE75 mesh routers during my Netherlands trip to allow extending my home Wi-Fi network’s coverage and/or replace any existing devices if they fail. This was important to me because the Wi-Fi 6E/7 mesh routers are no longer sold in India due to some uncertainty around the licensing and usage of the corresponding radio bands for Wi-Fi or telecom mobile networks. I hope this should suffice for the next 5 years or so.
Podcasts
After listening to and supporting Jupiter Broadcasting network’s podcasts for nearly a decade, I stopped listening to their shows this year because of the excessive bitcoin shilling (I hate cryptocurrencies) that took the focus away from the great content in those shows. It looks like they have been doubling down on the bitcoin stuff since I stopped listening, so there might be no way back for me. ☹️
The Late Night Linux family of podcasts have been as great as ever and provide a lot of excellent content. 2.5 Admins is my favorite podcast and I can’t wait to hear its every new episode.
I am currently evaluating ‘The Untitled Linux Show’ and so far it has been enjoyable.
FOSS contributions
This year, I have continued my recurring donation to the KDE project and started a new monthly donation to the Matrix project. If you haven’t done so, I strongly recommend donating/contributing to the FOSS projects of your choice.
Gratitude
2024 was a memorable and an eventful year, that ebbed and flowed every day. We are thankful for all the good and grateful for the privileges that allowed us to deal with the not-so-good well. Looking forward to a great 2025 ahead! Wish all of you a happy, prosperous, and fulfilling 2025! 🎉🙏
As I am passionate about self-hosting, I have been setting up various services in my homelab, in addition to those on my cloud servers. I have also been using Tailscale to access my devices and services while not at home. So I have wanted to have a seamless way to access the services, irrespective of whether I am on my home local area network (LAN) or connected to it via Tailscale. Below are my requirements for such a setup.
All the devices/services should be accessible using a fully-qualified domain name (FQDN), under a domain that I own and control. This rules out the auto-generated Tailscale subdomains.
I have a LinuxServer.io SWAG reverse proxy in front of all the services in my homelab, and it provides TLS termination. So I would like to access the existing services using TLS at all times.
While I could set up a Tailscale subnet router that allows access to my LAN, I do not want to allow the devices on my Tailnet full access to my LAN. And I do not want to redo my home LAN setup to isolate things to be able to do this.
The FQDNs of the exposed services should resolve to a LAN IP address when I am in my home LAN and to a Tailnet-specific address when I am not at home and connected to my Tailnet.
It should be possible to expose more services using this setup in the future, even if they are not behind the SWAG reverse proxy.
The base domain that I want to use for this should not have any publicly accessible DNS records pointing to private IP addresses for this setup to work.
The resulting setup should integrate into my existing docker-compose configuration.
The Tailscale docker documentation illustrates a way to expose LAN services on a Tailnet, but the example on that page causes the service(s) to be accessibly only over the Tailnet. So it doesn’t work for me.
To start, I added a Tailscale docker container to my compose.yaml file using a configuration like
For this to work, I had to define a tag named docker and add it to my Tailscale ACLs. I also added an ACL to auto-approve the routes advertised by this container.
With this, all the containers that get added to the tailnet-subnet network and have an IP address in the 172.21.0.0/24 subnet will be accessible over my Tailnet. So I updated the configuration of the swag container to add it to the tailnet-subnet network.
In the above snippet, I added the tailnet-subnet network to the networks key and assigned it a static IP address in its subnet, 172.21.0.12. Since the default network was implicitly included before and adding a different network will remove the implicit inclusion, I have also explicitly added the default network.
With these configuration changes, the swag container was accessible at the 172.21.0.12 IP address over my Tailnet. But I still needed to set up DNS to access the services by domain name.
Tailscale provides a way to add a restricted nameserver for a specific domain using split DNS. So I needed a DNS server that resolved the domains of the services hosted on the swag container to its Tailnet subnet IP address, 172.21.0.12.
For this, I took inspiration from jpillora/dnsmasq and created a custom Dockerfile that set up a dnsmasq resolver.
Then I ran docker compose build to build the container, and docker compose up -d dnsmasq to start it. With that, I had a DNS resolver to resolve my domain names in the Tailnet.
You might notice error messages in the dnsmasq container’s logs that look like dnsmasq: config error is REFUSED (EDE: not ready). This happens because we have not defined any upstream servers that dnsmasq can use. But since we want this dnsmasq instance to resolve only our domain names, this is okay and the error can be ignored.
Then on my Tailscale admin dashboard, I added a custom nameserver for my domain name and configured 172.21.0.3, the IP address of the dnsmasq container, as the address of the server to use. Now, all the devices on my Tailnet could access the services on my swag container by domain name.
I have an existing DNS setup on my home LAN that resolves the same domain names to the LAN IP addresses. So now, with this setup for Tailscale, my devices can seamlessly access the private services on my LAN and Tailnet.
If I want to add a new service to this setup, it is as easy as adding the tailscale-subnet network to it, and adding the DNS records to dnsmasq docker container’s configuration file and the resolver in my home LAN.
I use emacs as my editor and have it configured to delete all trailing whitespace in a file, including any trailing newlines at the end, before saving it. The configuration snippet that I have in my emacs configuration file to do this is
While this is very convenient and works as expected, it becomes a hindrance in specific cases – the Jinja2 templating language deletes a single trailing newline, thereby leaving the rendered templates without a newline at the end.
One way to work around this behaviour is to add 2 trailing newlines in the jinja2 template files. But unfortunately, due to my emacs configuration that deletes all trailing whitespace, this doesn’t work. So I started reading the documentation for the delete-trailing-whitespace function and found out about the delete-trailing-newlines variable (default: t). This variable controls whether the trailing newline characters at the end of a file are deleted or not. So I wanted to try overriding the delete-trailing-newlines variable to be false in jinja2-mode, that I use for editing Jinja2 templates.
With some help from the excellent folks in the #emacs IRC channel on Libera Chat, I was able to come up with the following configuration, that works as expected.
Note that I use the excellent use-package macro to install the jinja2-mode and configure it appropriately. If you don’t use use-package, this can be done using the add-hook function.
The Firefox multi-account container add-on is very useful for creating isolated containers for various sites and groups of sites. I use it every day and love it. The add-on provides a simple way to map certain domains to always open in specific containers. This is useful, but it doesn’t work well when sites use the same domain for multiple web applications that you want to isolate. Google, for example, does this and hosts Google search and Google maps on the same domain, and the add-on will open both of them in the same container, without a way to separate them.
Here’s where the Containerise add-on comes handy. It supports mapping URLs to specific containers using glob and regex patterns. Using this, I can add the following glob pattern for my Google container in the ‘Containerise’ add-on to isolate all Google searches to the Google container.
!https://www.google.com/search*
This is useful to prevent my Google searches from being directly linked to my Google account logged in another container or outside the containers.
I have been using the Netspeed widget on my KDE Plasma installations for a long time to display the network download and upload speed in the Plasma panel. When I upgraded to Kubuntu 22.04 a few months ago, I found that it stopped working. After doing some research, I found that the KSysGuard package that the widget depends on has been removed from the Debian and Ubuntu repositories as it is unmaintained (Debian bug).
Thanks to a useful suggestion on Reddit, I was able to recreate the functionality of this widget using the System Monitor Sensor widget. Here is what I did to achieve it.
Add the System Monitor Sensor widget to the panel.
Right-click the widget and click on the Configure System Monitor Sensor option in the menu
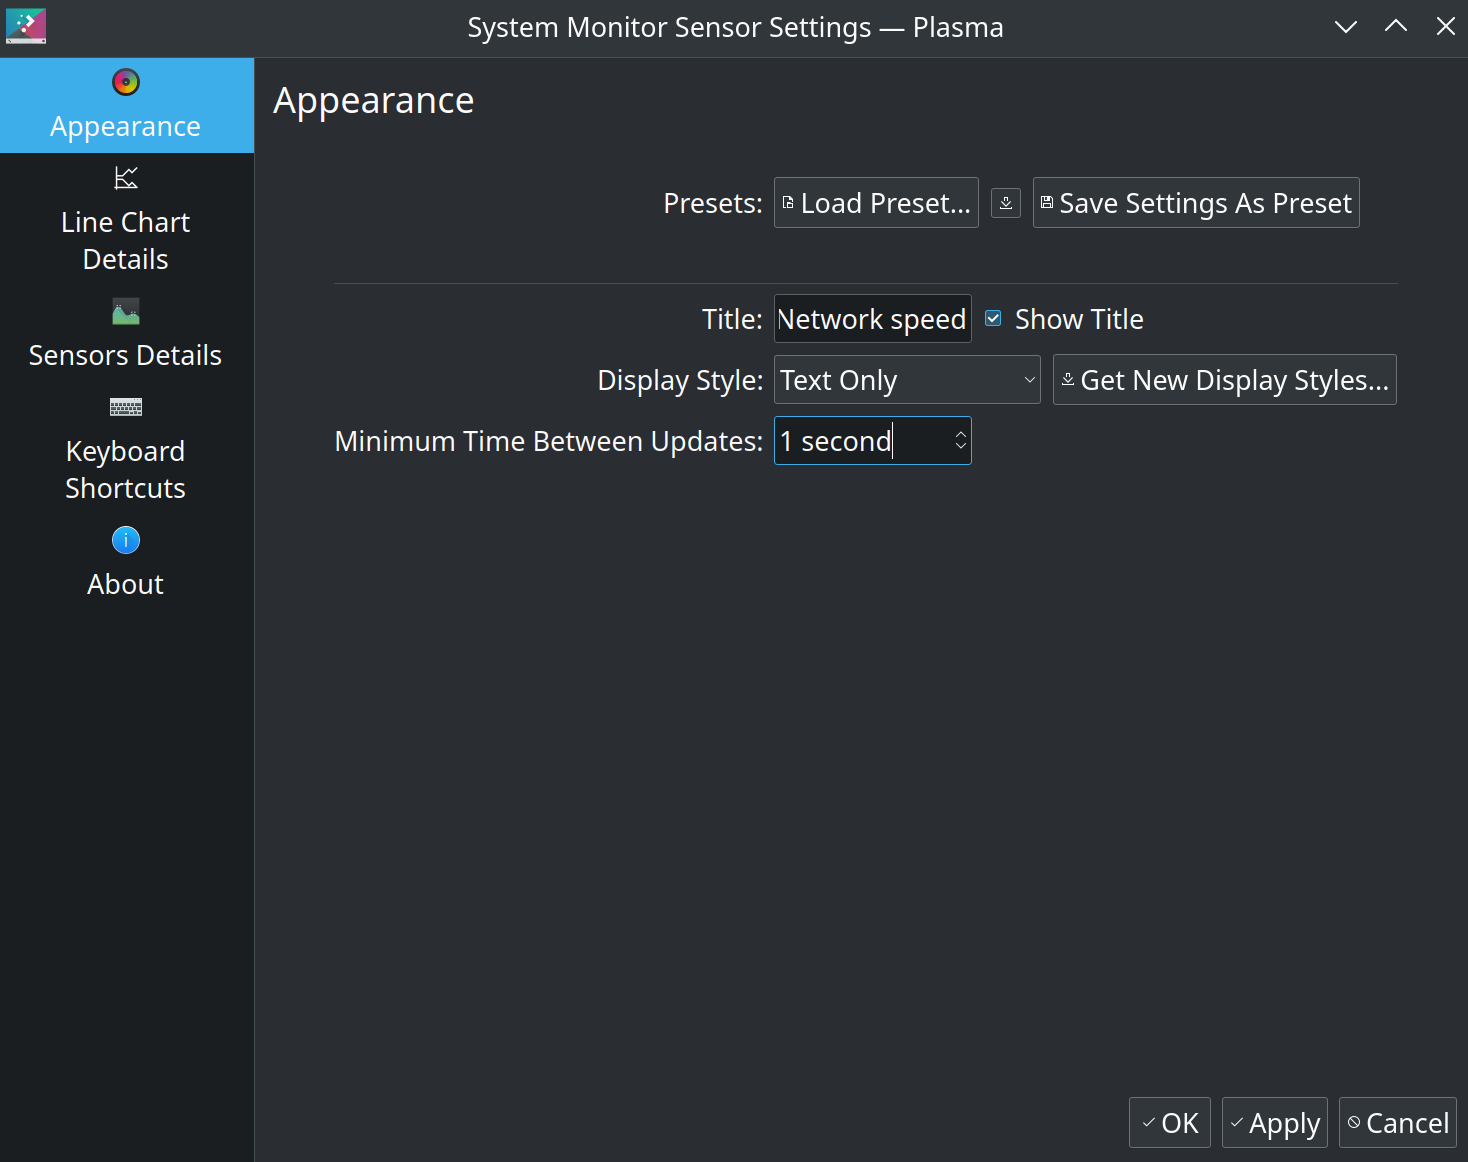
In the Appearance tab, load the Network speed preset, set the Display style to Text Only and set the Minimum Time Between Updates to 1 second. Apply the changes before proceeding to the next step.
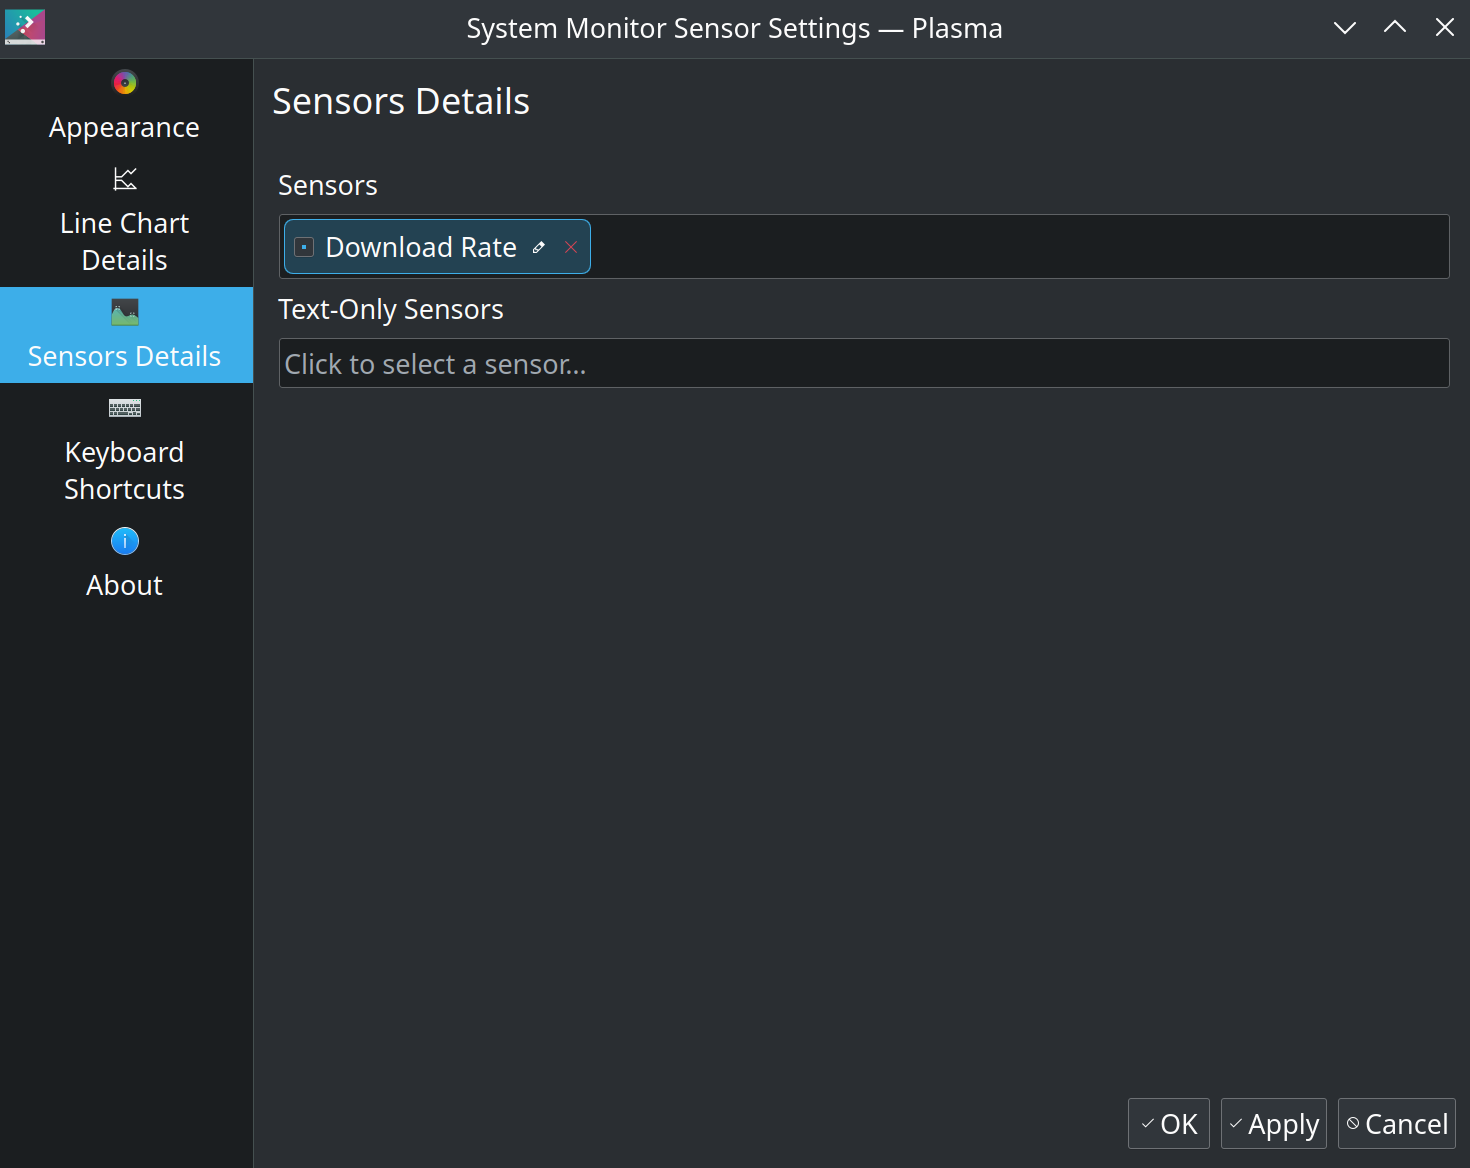
Open the Sensors Details tab and in the Text Only Sensors field, search for the Download Rate sensor. I chose the Download Rate (B/s) version. There is also a Download Rate (b/s) sensor, if you prefer that.
Click on the small pencil icon edit button just after the name of the widget, Download Rate, to edit it. Specify the down arrow symbol, ↓, as the name. Apply the changes.
Now you have a widget that shows the current download speed on the panel, updated once every second.
Add another System Monitor Sensor widget to the panel and configure it to display the Upload Rate by following the steps above, tweaked for displaying the upload rate.
The result of doing these steps should look like what is shown in the screenshot below.
With this, I have a good replacement for the NetSpeed Widget on my Kubuntu install.
I am a big fan of Willi Mutschler‘s btrfs-luks full disk encryption installation guides on his site, https://mutschler.dev, and have used them for installing Manjaro and Ubuntu 20.04 and newer versions. Recently, I set up Kubuntu 22.04 full disk encryption by following the same guide and noticed a couple of changes that had to be done to get it working. So I am documenting those here till he writes a new guide for Ubuntu 22.04. 🙂
In the step 3 of his excellent guide, the optimized mount options for SSD and NVMe drives are listed. The space_cache option mentioned in that section no longer works on Ubuntu 22.04 because the option has been renamed in the newer versions of the Linux kernel. So one has to specify the option as space_cache=v2. Otherwise, the Ubiquity installer will crash, and the installation will fail.
Also, in the Install the EFI bootloader section, it is a good idea to use the HWE Linux kernel package names corresponding to 22.04 instead of 20.04 since the packages containing the old LTS version in their name are ‘dummy transitional packages’. So the corresponding command can to be updated to
At the time of writing this post, the HWE package installs the same kernel version as the one that shipped with Ubuntu 22.04 since there isn’t a newer kernel released yet – these are usually backported from newer LTS versions.
With these minor changes, it should be possible to follow the steps in that documentation to set up full disk encryption with btrfs and luks on Ubuntu 22.04.
As a bonus, I have used the same guide for installing Kubuntu 20.04, 21.10 and 22.04, with appropriate substitutions, wherever needed.
I have usually skipped the last section in this guide, Install Timeshift, timeshift-autosnap-apt and grub-btrfs, in favour of using my tools of choice to do the same – Snapper and snapper-gui, both of which are available in the official Ubuntu repositories. I will write a blog post about it in the future. 🤞
This blog now integrates with the Fediverse using the ActivityPub protocol. This means that you can follow this blog by searching for lguruprasad@www.lguruprasad.in and following that account from any of the supported platforms mentioned here! 🎉