I have known about ZFS since 2009, when I was working for Sun Microsystems as a campus ambassador at my college. But it wasn’t until I started hearing Jim Salter (on the TechSNAP and 2.5 Admins podcasts) and Allan Jude (on the 2.5 Admins podcast) evangelize ZFS that I became interested in using it on my computers and servers. With Ubuntu shipping ZFS in the kernel for many years now, I had access to native ZFS!,
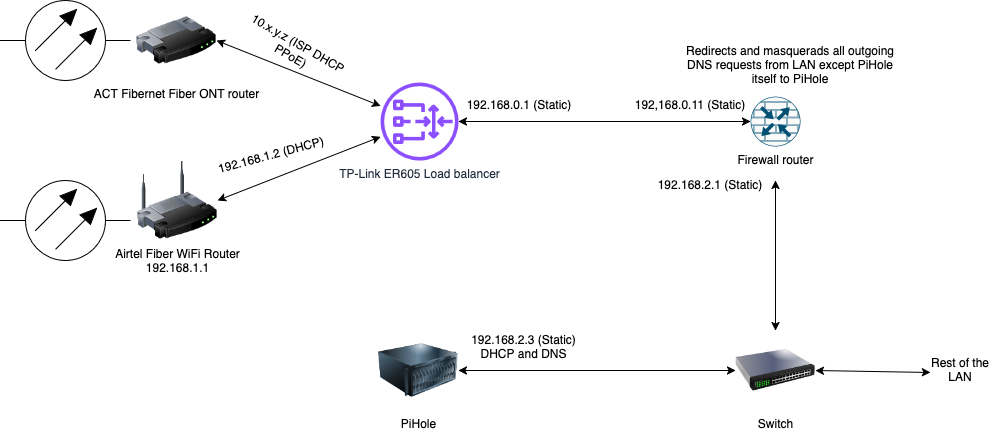
Here is an overview of my setup running Ubuntu + ZFS before I explain and document some of the details.
cube– A headless server running Ubuntu 24.04 LTS (at the time of writing) with ZFS on root and a lot of ZFS storage powered by mirrorvdevs. Hassanoidfor automatic snapshots.- Desktops and laptops in my home run (K)Ubuntu (24.04 or later; versions vary) with encrypted (ZFS native encryption) ZFS on root and ZFSBootMenu. These computers also use
sanoidfor automatic snapshots.
Sanoid configuration
On my personal computers, I use a minimal sanoid configuration that looks like
############
# datasets #
############

[zroot]
        use_template = production
        recursive = zfs


#############
# templates #
#############

[template_production]
        frequently = 0
        hourly = 26
        daily = 30
        monthly = 3
        yearly = 0
        autosnap = yes
        autoprune = yes

[template_ignore]
        autoprune = no
        autosnap = no
        monitor = no
On servers, the sanoid configuration has some additional tweaks, like the following template to not snapshot replicated datasets.
[template_backup]
        frequently = 0
        hourly = 36
        daily = 30
        monthly = 3
        yearly = 0
        # don't take new snapshots - snapshots
        # on backup datasets are replicated in
        # from source, not generated locally
        autosnap = no
Pre-apt snapshots
While sanoid provides periodic ZFS snapshots, I also wanted to wrap apt transactions in ZFS snapshots for the ability to roll back any bad updates/upgrades. For this, I used the following shell script,
#!/usr/bin/env bash

DATE="$(/bin/date +%F-%T)"
zfs snapshot -r zroot@snap_pre_apt_"$DATE"
with the following apt hook in /etc/apt/apt.conf.d/90zfs-pre-apt-snapshot.
// Takes a snapshot of the system before package changes.
DPkg::Pre-Invoke {"[ -x /usr/local/sbin/zfs-pre-apt-snapshot ] && /usr/local/sbin/zfs-pre-apt-snapshot || true";};
This handles taking snapshots before apt transactions but doesn’t prune the snapshots at all. For that, I used the zfs-prune-snapshots script (from https://github.com/bahamas10/zfs-prune-snapshots) in a wrapper cron shell (schedule varies per computer) script that looks like
#!/bin/sh

/usr/local/sbin/zfs-prune-snapshots \
    -p 'snap_pre_apt_' \
    1w 2>&1 | logger \
    -t cleanup-zfs-pre-apt-snapshots
Snapshot replication
The cube server has sufficient disk space to provide a replication target for all my other personal computers using ZFS. It has a pool named dpool, which will be referenced in the details to follow.
For automating snapshot replication, I chose to use syncoid from the same sanoid package. To avoid giving privileged access to the sending and the receiving user accounts, my setup closely follows the path in https://klarasystems.com/articles/improving-replication-security-with-openzfs-delegation/.
On my personal computer, I granted my unprivileged (but has sudo 🤷♂️) local user account the hold and send permissions on the root dataset, zroot.
sudo zfs allow send-user hold,send zroot

zfs allow zroot
---- Permissions on zroot --------------------------------------------
Local+Descendent permissions:
        user send-user hold,send
On the cube server, I created an unprivileged user (no sudo permissions here 😌) and granted it the create,mount,receive permissions temporarily on the parent of the target dataset, dpool.
Then I performed an initial full replication of a local snapshot by running the following commands as the unprivileged user.
zfs send \
  zroot@snapshot-name | ssh \
  remote-user@cube \
  zfs receive -u \
  dpool/local-hostname

zfs send \
  zroot/ROOT@snapshot-name | ssh \
  remote-user@cube \
  zfs receive -u \
  dpool/local-hostname/ROOT

zfs send \
  zroot/ROOT/os-name@snapshot-name | ssh \
  remote-user@cube \
  zfs receive -u \
    dpool/local-hostname/ROOT/os-name

zfs send \
  zroot/home@snapshot-name | ssh \
  remote-user@cube \
  zfs receive -u \
  dpool/local-hostname/home
The -u flag in the zfs receive commands above will prevent it from trying to mount the remote dataset. The target remote dataset must not exist when running this initial full replication.
As it is not a good practice to allow unprivileged users to mount filesystems, I disabled automatic mounting by running
zfs set mountpoint=none dpool/local-hostnameas the sudo user on the target server.
Then I narrowed down the permissions of the receiving user to only its own dataset by running
zfs unallow remote-user \
  create,mount,receive dpool

zfs allow remote-user \
  create,mount,receive dpool/local-hostname
on the target server.
Next, I tried to test the snapshot replication by running syncoid manually like
syncoid -r \
  --no-privilege-elevation \
  --no-sync-snap \
  zroot \
  remote-user@cube:dpool/local-hostname
and it replicated all the other snapshots all on the local datasets (we had only replicated one snapshot previously).
The sanoid package in Debian and Ubuntu does not ship with a systemd timer for syncoid. So I created a user service and a timer that look like the following examples.
# ~/.config/systemd/user/syncoid.service
[Unit]
Description=Replicate sanoid snapshots

[Service]
Type=oneshot
ExecStart=/usr/sbin/syncoid -r --no-privilege-elevation --no-sync-snap zroot remote-user@cube:dpool/local-hostname
# ~/.config/systemd/user/syncoid.timer
[Unit]
Description=Run Syncoid to replicate ZFS snapshots to cube
[Timer]
OnCalendar=*:0/15
Persistent=true
[Install]
WantedBy=timers.targetThen I reloaded systemd, enabled and started the above timer to have everything working smoothly.