Category: Internet

  • Redirect all outgoing DNS requests to the local Pi-hole instance using OPNsense

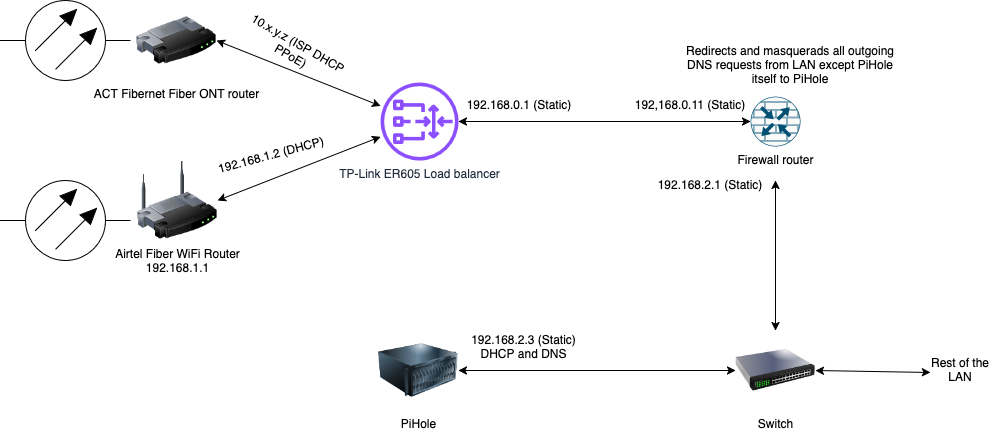
    In my previous post, I had explained how I set up an N100 mini PC as an OPNsense firewall in my home network. One of the main purposes of having such a firewall was to (transparently) redirect all outgoing DNS requests to the local Pi-hole instance.

    I have a Pi-hole instance serving DHCP and DNS in my LAN and most client devices respect the DNS settings provided by the DHCP server. But Android devices (I have an Android TV at home) ignore it and choose to use the Google DNS servers instead. So I need this redirect in place to have network-level ad-blocking working.

    Pi-hole logo
    Pi-hole logo

    In the previous firewalls and gateway devices, I had to set up a DNAT rule to redirect all outgoing traffic to port 53 except for the traffic originating from the Pi-hole instance to the Pi-hole instance’s address on port 53. To prevent “unexpected source” errors that can happen after adding the DNAT rule, I had to enable masquerading the redirected packets to have the firewall/gateway device’s IP address as the source IP address using SNAT.

    Now OPNsense is built on top of FreeBSD, which has its own pf firewall and that works differently from the Linux iptables firewall. So this is what I had to do to get the DNS redirect working.

    I started with a fresh installation of OPNsense. So ymmv, if you start with some existing configuration. I enabled the ‘Automatic outbound NAT for Reflection’ option in Firewall > Settings > Advanced. This is necessary for the automatic masquerading of the source address while performing the redirect, since the default for outbound NAT in OPNsense is ‘Automatic outbound NAT rule generation (no manual rules can be used)’.

    Then I went to Firewall > NAT > Port Forward and clicked on the + icon to add a new rule that looks like the below screenshot.

    Add a port forward rule

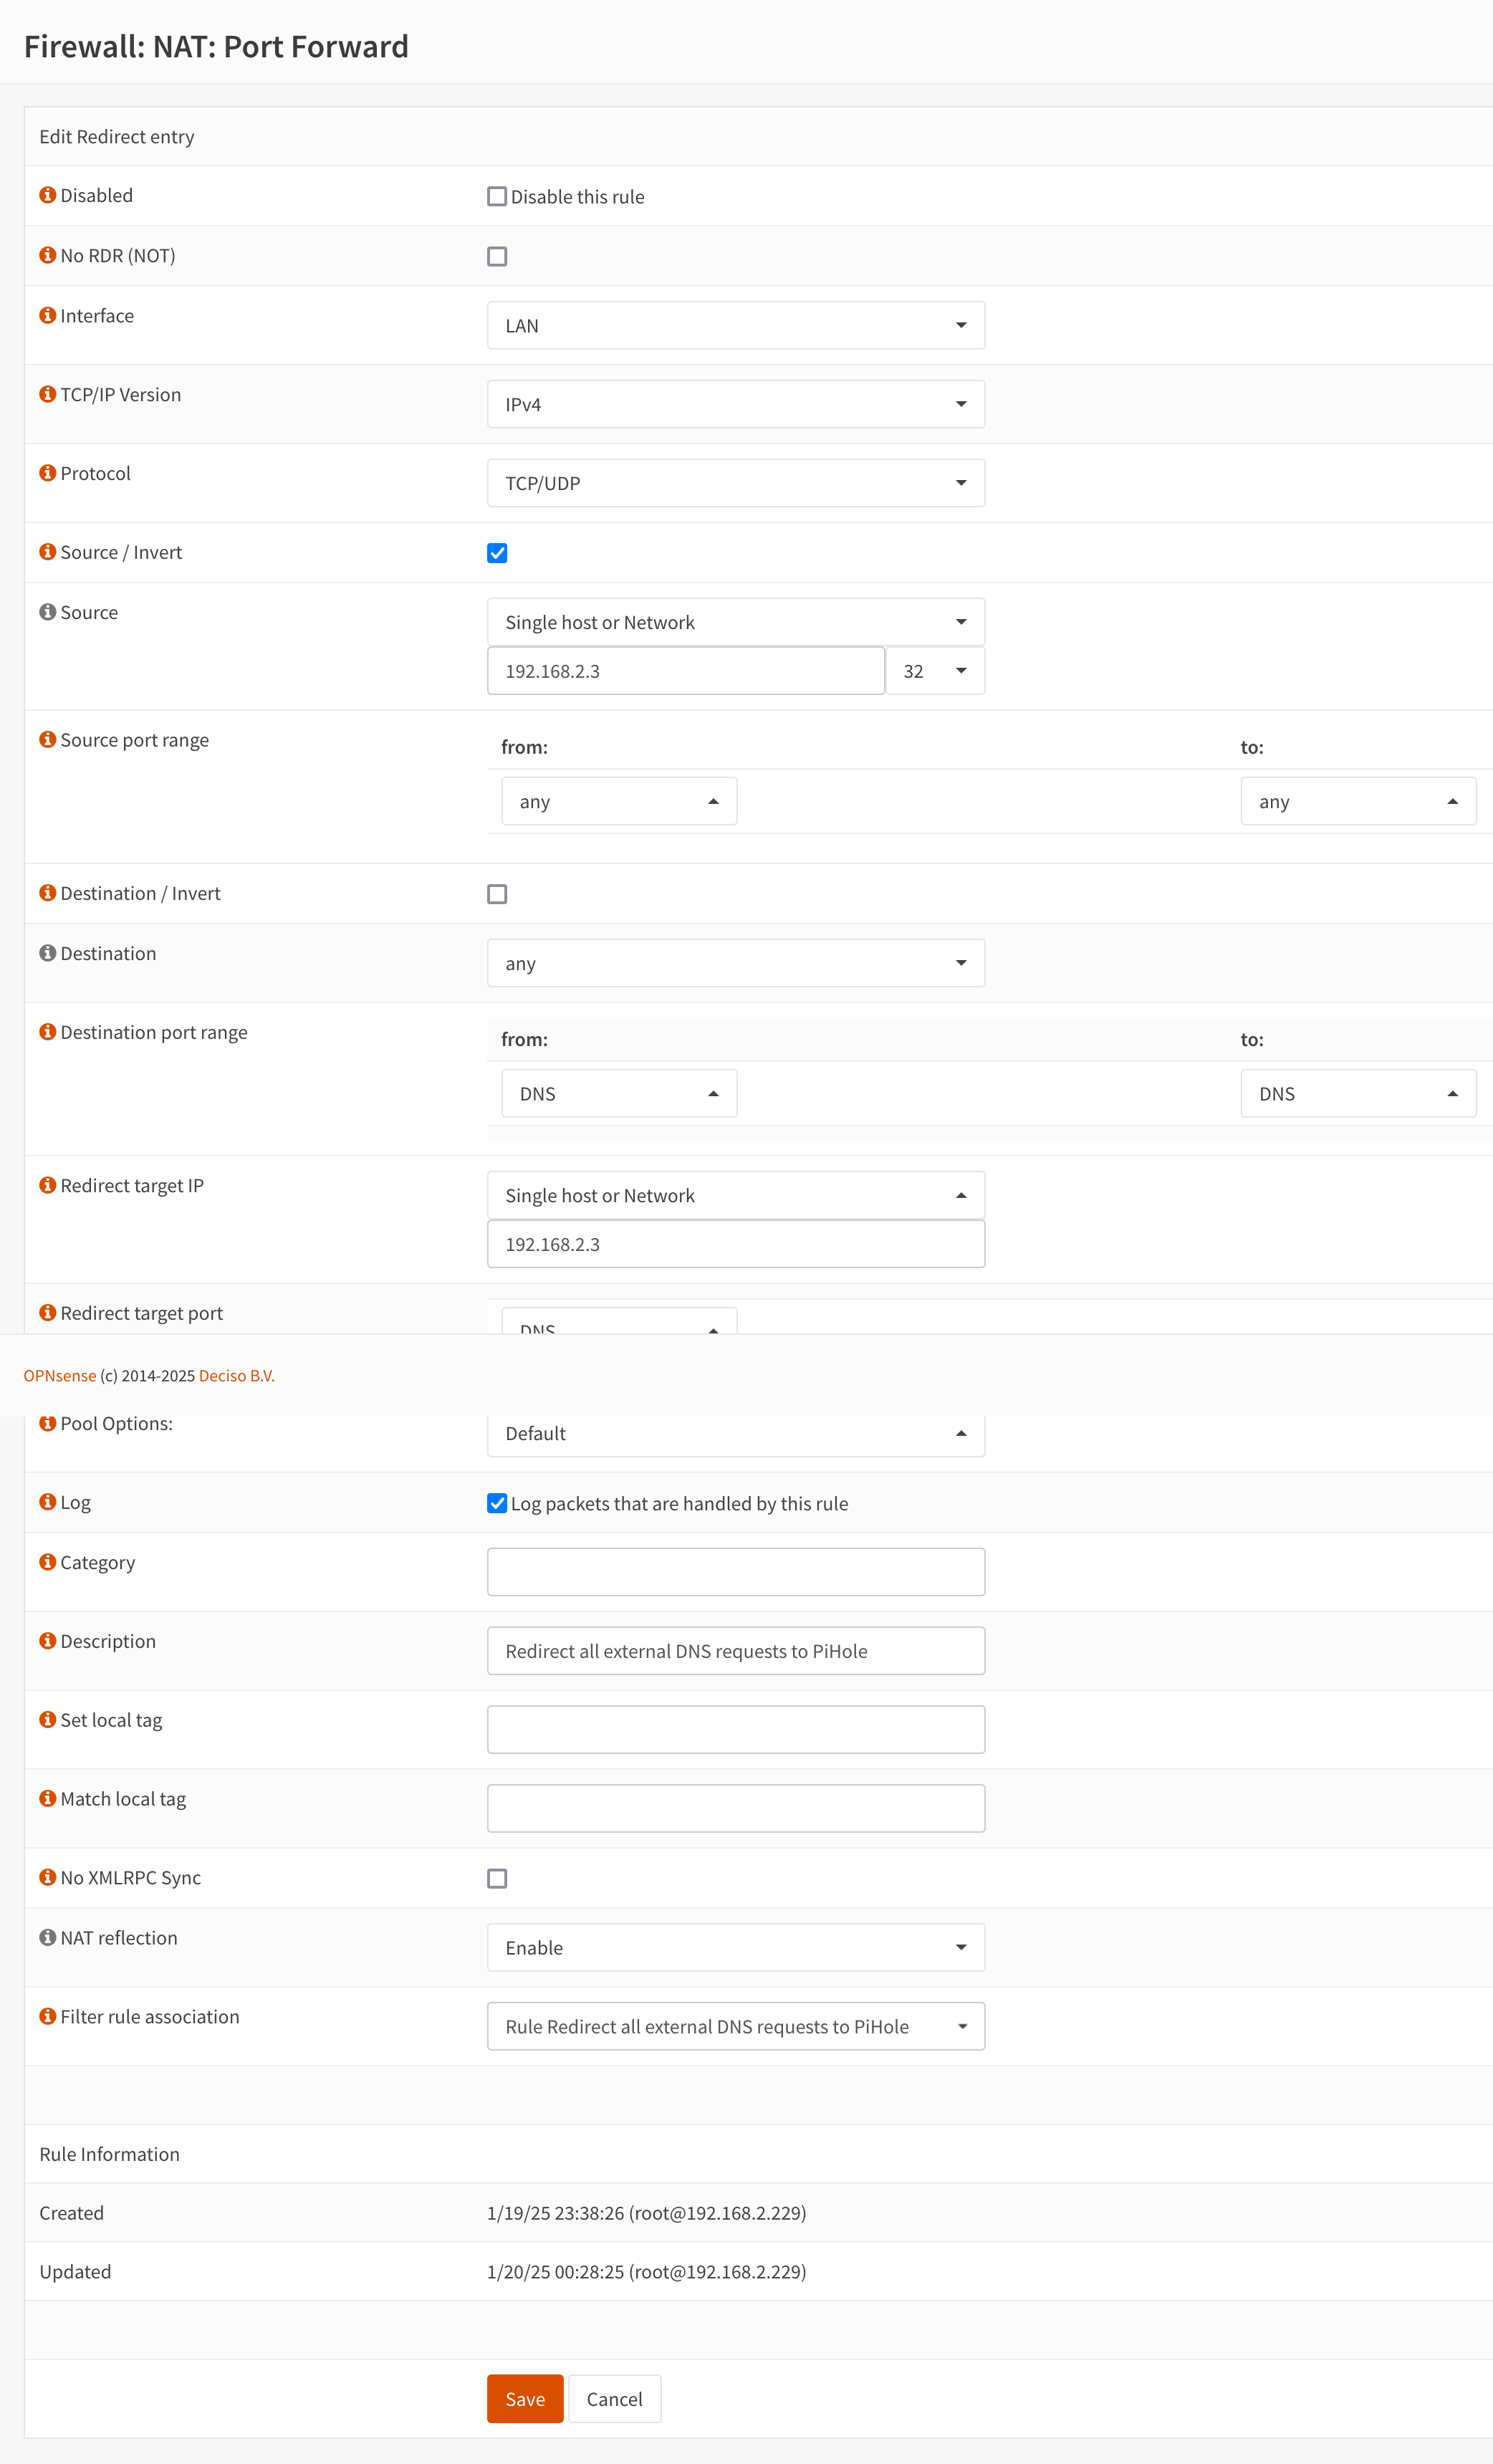
    Here are the relevant settings that I changed before saving the rule.

    • Interface: LAN
    • TCP/IP Version: IPv4
    • Protocol: TCP/UDP
    • Source/Invert: (checked)
    • Source: Single host or Network, 192.168.2.3/32 (this is the IP address of my Pi-hole instance)
    • Redirect target port: DNS (I apologize for the screenshot partially hiding this)
    • Description: Redirect all external DNS requests to PiHole
    • NAT Reflection: Enable
    • Filter rule association: Add associated filter rule

    Then I went to the Firewall > Rules > LAN page and moved the custom associated filter rule to the top of the rule list so that it looks similar to the below screenshot.

    Associated firewall rule moved to the top of the rule list
    Associated firewall rule moved to the top of the rule list

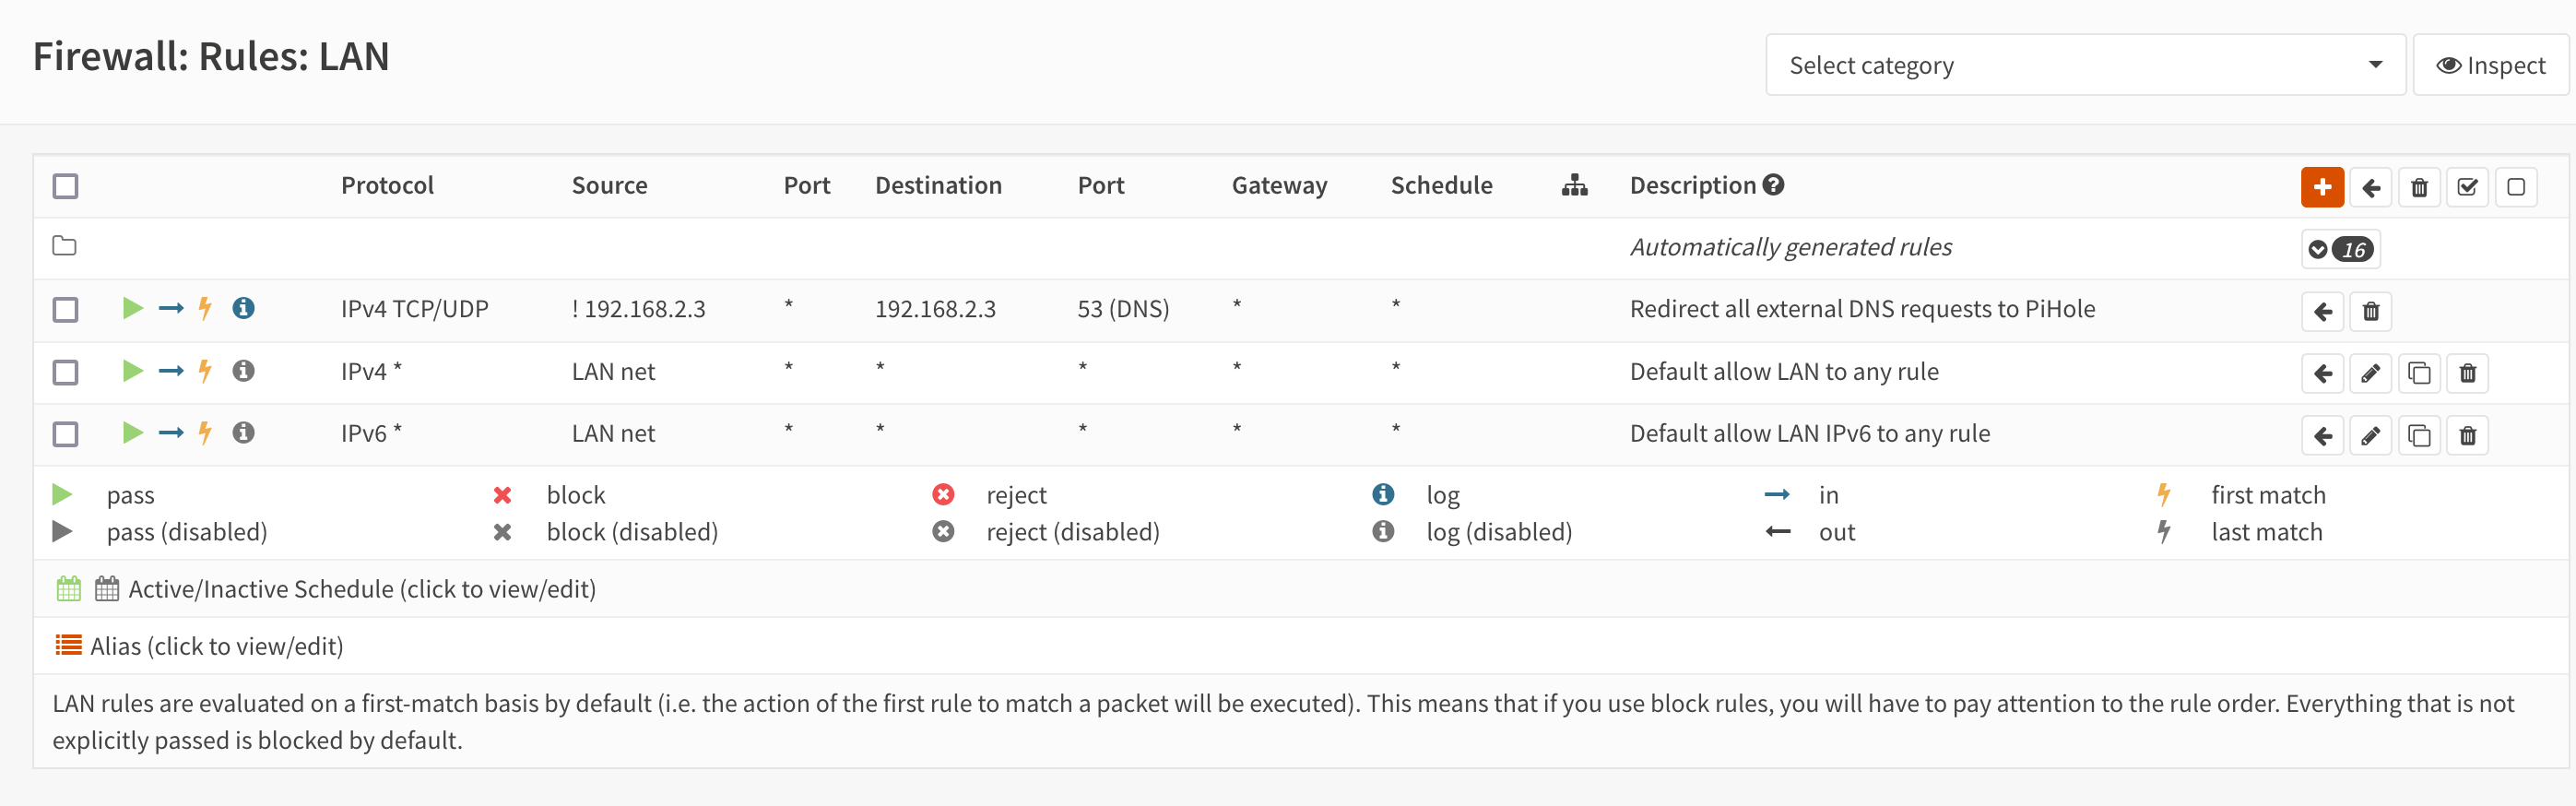
    Now, when I queried the DNS record for a domain using dig, it got a response from my Pi-hole instance. When I queried Google DNS for a blocked-in-my-Pi-hole domain using a command like dig blocked-domain.com @8.8.8.8, it got redirected to the Pi-hole DNS server and received a 0.0.0.0 address in the response as if it was from the Google DNS resolver, 8.8.8.8. So it all worked! 🎉

    Bonus reading: https://labzilla.io/blog/force-dns-pihole. This talks about doing a similar thing using pfSense, which OPNsense is a fork of and has slightly different rules starting from a different baseline to achieve a similar result. It also explains a way to block all outgoing DNS-over-HTTPS (DoH) using pfSense. The linked Hacker News thread also has insightful comments on this topic.

  • How I replaced my home firewall with an x86 OPNsense setup

    I have been working remotely for the past 6+ years, and my wife has been working remotely for the past few years. So we have 2 internet connections at our home, with one configured as a primary and the other as a backup on the TP-Link ER605 load balancer. The load balancer is configured to fail over automatically to the backup connection when the primary connection goes down.

    In our home, we have run Ethernet cables through the walls and provided one port in each of the rooms and living rooms. All these cables terminate at a central location in the hub in a switch and then go through a firewall router to the load balancer and to the internet. The high-level view of this setup looks like the following diagram.

    A high-level diagram of my home network and how it connects to the internet.
    A high-level diagram of my home network and how it connects to the internet

    As shown in the above diagram, I also have a Pi-hole instance that acts as the DHCP and DNS server for my home LAN. It works well to provide network-level ad-blocking services for all devices in the LAN. However, some devices, Android devices in particular, often ignore the DNS server provided by DHCP and use the hard-coded Google DNS instead, bypassing ad-blocking. Even that is okay in many cases, except a few. We have a Sony X90H smart television that runs the Android TV operating system. Without network-level ad-blocking, it shows a lot of non-dismissible advertisements for content from apps that we haven’t installed or used. So I have always used a firewall device of some sort to force the usage of Pi-hole as the DNS server in my LAN. I have done this in the past with a Netgear Nighthawk R7000 router running the FreshTomato firmware, a Seeed Studio reRouter, and a GL.iNet Beryl AX travel router since last evening.

    Speaking of that, the reRouter device, which I have used for 2+ years now, has been crashing and boot-looping frequently in the past few months and causing internet disconnections. I have been planning to replace that with a more reliable and powerful x86 mini-PC with OPNsense on it. I ordered the Skullsaints Onyx Intel 12th Gen N100 Mini PC last night for this new project. This was an easy choice since I have been hearing good things about N100 mini PCs on the Late Night Linux family of podcasts. While I waited for the delivery, I set up the GL.iNet Beryl AX travel router as a stop-gap replacement.

    Skullsaints Onyx Mini PC

    I bought this specific product because it has 4 2.5G Ethernet ports, which would allow me to do internet load balancing too in the future and simplify my networking setup. It came with a no-name brand 256 GB M.2 NVMe SSD preloaded with Windows 11 Pro and 8 GB of RAM. As I had read reviews about this device heating up due to lack of/dried thermal paste, I checked and confirmed that the thermal paste was intact.

    Then I downloaded the latest OPNsense image, dd‘ed it to a USB flash drive and installed it on this device. Then I opened up the OPNsense web interface and went through the setup wizard to configure the firewall. When I installed it in place of my previous firewall, nothing worked and I had no idea why. I took help from the friendly folks on the #OPNsense IRC channel on libera.chat to correct my mistakes and get the configuration working the way I wanted it to. Below are the details of how I did it.

    OPNsense wizard page showing the general system configuration options.
    General System Information configuration

    In the above page, I configured the hostname, domain and the DNS servers used by OPNsense. I specified 192.168.2.3, the IP address of my Pi-hole instance, as the primary DNS server and added the Google DNS address as the secondary. Even though it wasn’t necessary, I left the built-in Unbound resolver enabled.

    OPNsense wizard page showing the Time Server configuration options.
    Time Server configuration

    I configured my timezone in this page.

    OPNsense wizard page with configuration options for the WAN interface
    WAN interface configuration

    This page had a lot of options for configuring the WAN interface (I will need to revisit these when doing the multi-WAN load balancer setup in the future). I set up a static IP for the WAN interface in the 192.168.0.0/24 subnet, since that is what I had used in the previous setup. I also disabled the blocks for accessing RFC1918 networks and bogon networks (this was not necessary) from the WAN-side, since this device doesn’t directly connect to the internet.

    OPNsense wizard page with options for configuring the LAN interface
    LAN interface configuration

    In this page, I configured the LAN interface address to be the same as what I had in the previous setup. In the following page, I configured the root password and completed the wizard to apply the configured changes. With this setup, I had a working router between my LAN and the load balancer.

    Since the metal top of the mini PC’s case acts as a passive heat sink, I could feel it getting very hot even though the OPNsense thermal sensors showed a low, static temperature. I will monitor this in the coming days to make sure that there are no thermal issues.

    I still had to configure the firewall to force redirect all outgoing DNS requests to the local Pi-hole server, the details of which I will share in the next blog post — Redirect all outgoing DNS requests to the local Pi-hole instance using OPNsense.

  • URL shortening – the good, the bad and the ugly

    Microblogging has become a rage with the advent and success of Twitter which had a tagline – “What are you doing?”. Gradually it has become a platform for information sharing and communication. People have started sharing interesting and relevant links that they come across on the web which get shared again and again multiple times, disseminating information unimaginably fast to a large target audience. Microblogging imposes a limit on the number of characters in a message and hence the traditional URLs on the internet are very long and unsuitable for sharing over microblogging. So in came a series of URL shortening services that accepted a long, microblogging unfriendly URLs and gave out a URL much shorter in size which could be used on microblogging platforms and are print-friendly. What actually happens in the background is that, these URL shortening services create a short URL and map it to the long URL and whenever the short URL is referenced, the URL shortening services do a 301 redirect to the actual URL so that it opens.

    There are a lot of aspects to this URL shortening services that most of the users don’t realize/are unaware of. One of the very important issues is that these shortened URLs are capable of breaking the internet. A shortened URL in a tweet for instance, may be a dangling link to nowhere if the corresponding URL shortening service purges its database or stops providing the service. A lot of popular URL shortening services are closing either because they can’t handle spammers’ abuse or they couldn’t make enough money out of the service to keep it running. Read about Link rot to get more details. This might also result in us losing the link that we wanted to share. The URL shortening services also provide client APIs to use their services which makes them more vulnerable to abuse and spamming.

    Also shortened URLs hide the target link that we are trying to open, which could be a malicious one, which in its normal form most of us wouldn’t open. Nowadays the URL shortening services provide an option to preview the links before opening them, but there is a big question mark over how many users actually use that feature. Another significant issue is that the URL shortening services add an additional layer of indirection, an unreliable middleman, which adds to more DNS lookups and server hits and hence more traffic on the internet.

    One of the possible ways to mitigate the evils of URL shortening is that every website could provide shortened URLs for its own content so that there is no need for a separate URL shortening service standing in the middle. This could reduce dangling links created due to issues with the third-party URL shortening service. For instance, every post on this blog has its own long URL and a corresponding short URL under the same domain. This makes sure that as long as the domain of this website is up, the shortened URLs too will be pointing to valid pages and hence lesser chances of link rot happening.

    I got to know all these stuff while I was creating a URL shortening client application that uses the APIs of popular URL shortening services to create shortened URLs. I have decided to use URL shortening services very sparingly, only for ephemeral stuff or when there is a need to shorten a URL to meet the character limits of microblogging services. Hope this post will make the readers aware of the various aspects of URL shortening services so that they will use it very sparingly.