The Midnight Sun

Category: FOSS

  • Redirect all outgoing DNS requests to the local Pi-hole instance using OPNsense

    In my previous post, I had explained how I set up an N100 mini PC as an OPNsense firewall in my home network. One of the main purposes of having such a firewall was to (transparently) redirect all outgoing DNS requests to the local Pi-hole instance.

    I have a Pi-hole instance serving DHCP and DNS in my LAN and most client devices respect the DNS settings provided by the DHCP server. But Android devices (I have an Android TV at home) ignore it and choose to use the Google DNS servers instead. So I need this redirect in place to have network-level ad-blocking working.

    Pi-hole logo
    Pi-hole logo

    In the previous firewalls and gateway devices, I had to set up a DNAT rule to redirect all outgoing traffic to port 53 except for the traffic originating from the Pi-hole instance to the Pi-hole instance’s address on port 53. To prevent “unexpected source” errors that can happen after adding the DNAT rule, I had to enable masquerading the redirected packets to have the firewall/gateway device’s IP address as the source IP address using SNAT.

    Now OPNsense is built on top of FreeBSD, which has its own pf firewall and that works differently from the Linux iptables firewall. So this is what I had to do to get the DNS redirect working.

    I started with a fresh installation of OPNsense. So ymmv, if you start with some existing configuration. I enabled the ‘Automatic outbound NAT for Reflection’ option in Firewall > Settings > Advanced. This is necessary for the automatic masquerading of the source address while performing the redirect, since the default for outbound NAT in OPNsense is ‘Automatic outbound NAT rule generation (no manual rules can be used)’.

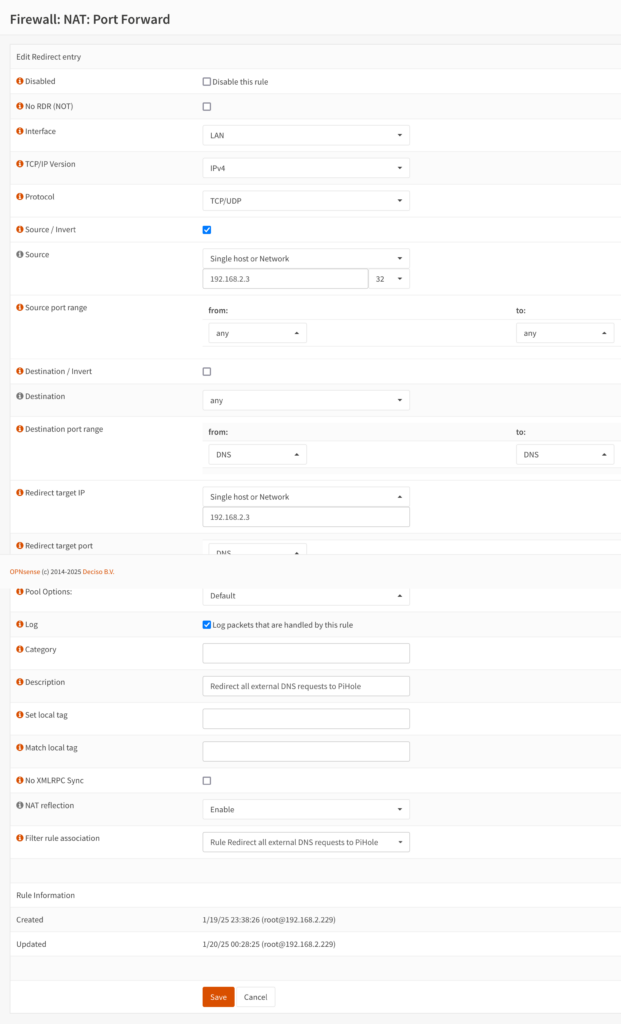
    Then I went to Firewall > NAT > Port Forward and clicked on the + icon to add a new rule that looks like the below screenshot.

    Add a port forward rule

    Here are the relevant settings that I changed before saving the rule.

    • Interface: LAN
    • TCP/IP Version: IPv4
    • Protocol: TCP/UDP
    • Source/Invert: (checked)
    • Source: Single host or Network, 192.168.2.3/32 (this is the IP address of my Pi-hole instance)
    • Redirect target port: DNS (I apologize for the screenshot partially hiding this)
    • Description: Redirect all external DNS requests to PiHole
    • NAT Reflection: Enable
    • Filter rule association: Add associated filter rule

    Then I went to the Firewall > Rules > LAN page and moved the custom associated filter rule to the top of the rule list so that it looks similar to the below screenshot.

    Associated firewall rule moved to the top of the rule list
    Associated firewall rule moved to the top of the rule list

    Now, when I queried the DNS record for a domain using dig, it got a response from my Pi-hole instance. When I queried Google DNS for a blocked-in-my-Pi-hole domain using a command like dig blocked-domain.com @8.8.8.8, it got redirected to the Pi-hole DNS server and received a 0.0.0.0 address in the response as if it was from the Google DNS resolver, 8.8.8.8. So it all worked! πŸŽ‰

    Bonus reading: https://labzilla.io/blog/force-dns-pihole. This talks about doing a similar thing using pfSense, which OPNsense is a fork of and has slightly different rules starting from a different baseline to achieve a similar result. It also explains a way to block all outgoing DNS-over-HTTPS (DoH) using pfSense. The linked Hacker News thread also has insightful comments on this topic.

    Fediverse Reactions
    January 20, 2025
  • How I replaced my home firewall with an x86 OPNsense setup

    I have been working remotely for the past 6+ years, and my wife has been working remotely for the past few years. So we have 2 internet connections at our home, with one configured as a primary and the other as a backup on the TP-Link ER605 load balancer. The load balancer is configured to fail over automatically to the backup connection when the primary connection goes down.

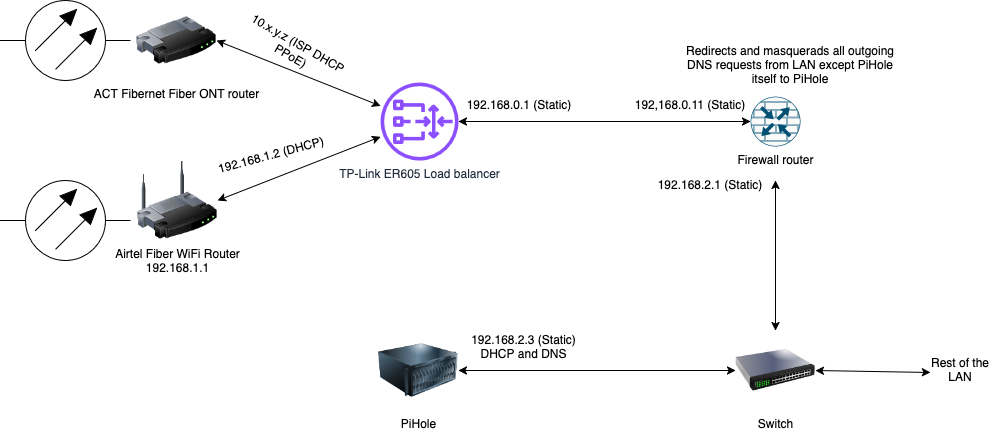
    In our home, we have run Ethernet cables through the walls and provided one port in each of the rooms and living rooms. All these cables terminate at a central location in the hub in a switch and then go through a firewall router to the load balancer and to the internet. The high-level view of this setup looks like the following diagram.

    A high-level diagram of my home network and how it connects to the internet.
    A high-level diagram of my home network and how it connects to the internet

    As shown in the above diagram, I also have a Pi-hole instance that acts as the DHCP and DNS server for my home LAN. It works well to provide network-level ad-blocking services for all devices in the LAN. However, some devices, Android devices in particular, often ignore the DNS server provided by DHCP and use the hard-coded Google DNS instead, bypassing ad-blocking. Even that is okay in many cases, except a few. We have a Sony X90H smart television that runs the Android TV operating system. Without network-level ad-blocking, it shows a lot of non-dismissible advertisements for content from apps that we haven’t installed or used. So I have always used a firewall device of some sort to force the usage of Pi-hole as the DNS server in my LAN. I have done this in the past with a Netgear Nighthawk R7000 router running the FreshTomato firmware, a Seeed Studio reRouter, and a GL.iNet Beryl AX travel router since last evening.

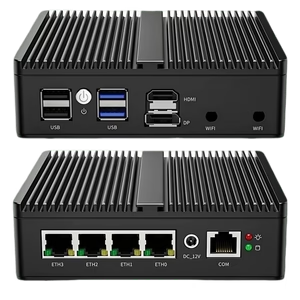
    Speaking of that, the reRouter device, which I have used for 2+ years now, has been crashing and boot-looping frequently in the past few months and causing internet disconnections. I have been planning to replace that with a more reliable and powerful x86 mini-PC with OPNsense on it. I ordered the Skullsaints Onyx Intel 12th Gen N100 Mini PC last night for this new project. This was an easy choice since I have been hearing good things about N100 mini PCs on the Late Night Linux family of podcasts. While I waited for the delivery, I set up the GL.iNet Beryl AX travel router as a stop-gap replacement.

    Skullsaints Onyx Mini PC

    I bought this specific product because it has 4 2.5G Ethernet ports, which would allow me to do internet load balancing too in the future and simplify my networking setup. It came with a no-name brand 256 GB M.2 NVMe SSD preloaded with Windows 11 Pro and 8 GB of RAM. As I had read reviews about this device heating up due to lack of/dried thermal paste, I checked and confirmed that the thermal paste was intact.

    Then I downloaded the latest OPNsense image, dd‘ed it to a USB flash drive and installed it on this device. Then I opened up the OPNsense web interface and went through the setup wizard to configure the firewall. When I installed it in place of my previous firewall, nothing worked and I had no idea why. I took help from the friendly folks on the #OPNsense IRC channel on libera.chat to correct my mistakes and get the configuration working the way I wanted it to. Below are the details of how I did it.

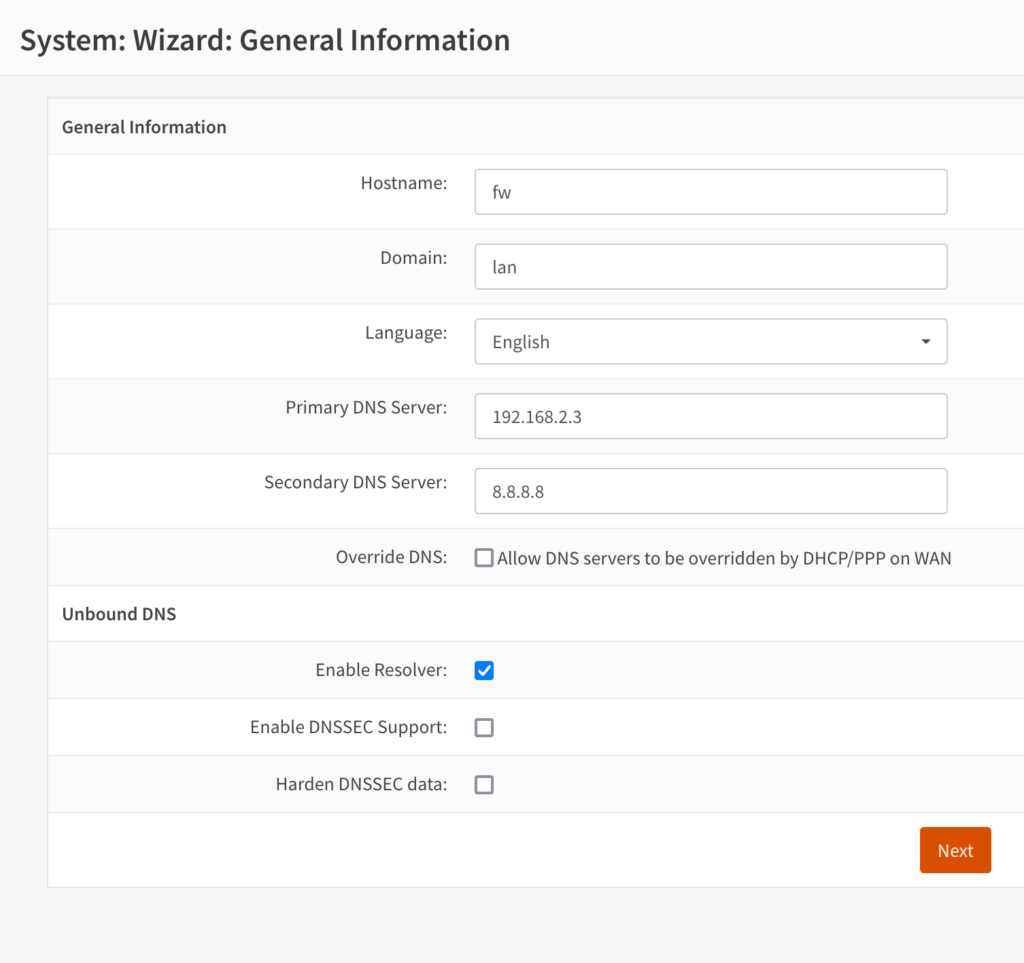
    OPNsense wizard page showing the general system configuration options.
    General System Information configuration

    In the above page, I configured the hostname, domain and the DNS servers used by OPNsense. I specified 192.168.2.3, the IP address of my Pi-hole instance, as the primary DNS server and added the Google DNS address as the secondary. Even though it wasn’t necessary, I left the built-in Unbound resolver enabled.

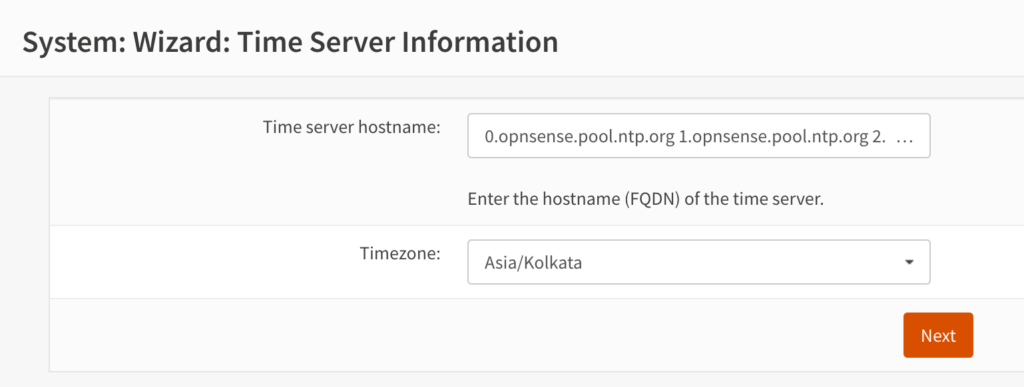
    OPNsense wizard page showing the Time Server configuration options.
    Time Server configuration

    I configured my timezone in this page.

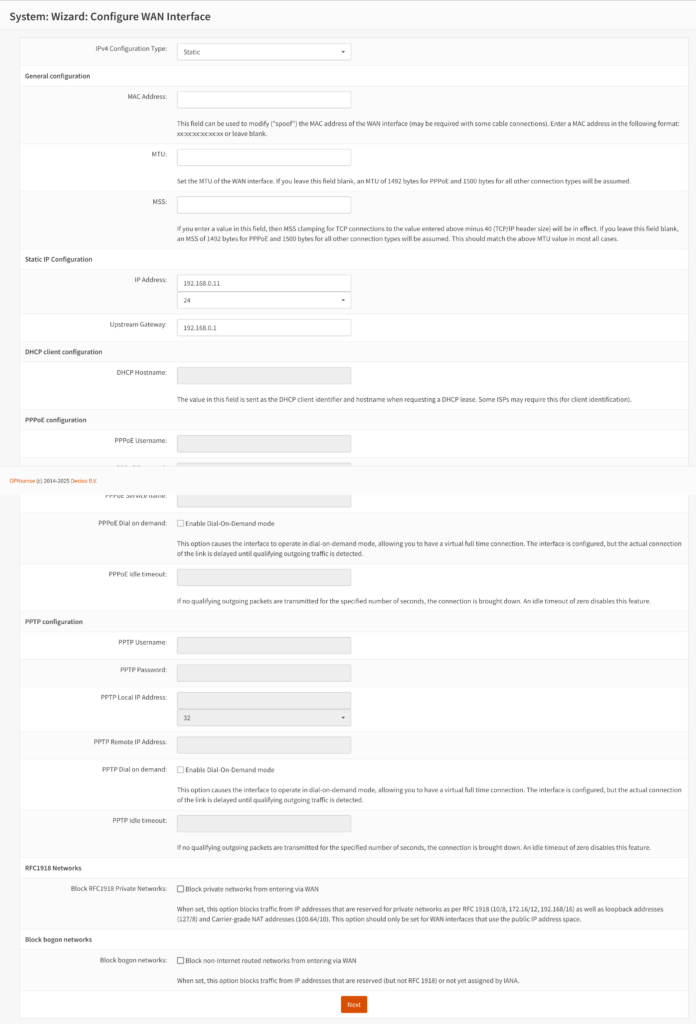
    OPNsense wizard page with configuration options for the WAN interface
    WAN interface configuration

    This page had a lot of options for configuring the WAN interface (I will need to revisit these when doing the multi-WAN load balancer setup in the future). I set up a static IP for the WAN interface in the 192.168.0.0/24 subnet, since that is what I had used in the previous setup. I also disabled the blocks for accessing RFC1918 networks and bogon networks (this was not necessary) from the WAN-side, since this device doesn’t directly connect to the internet.

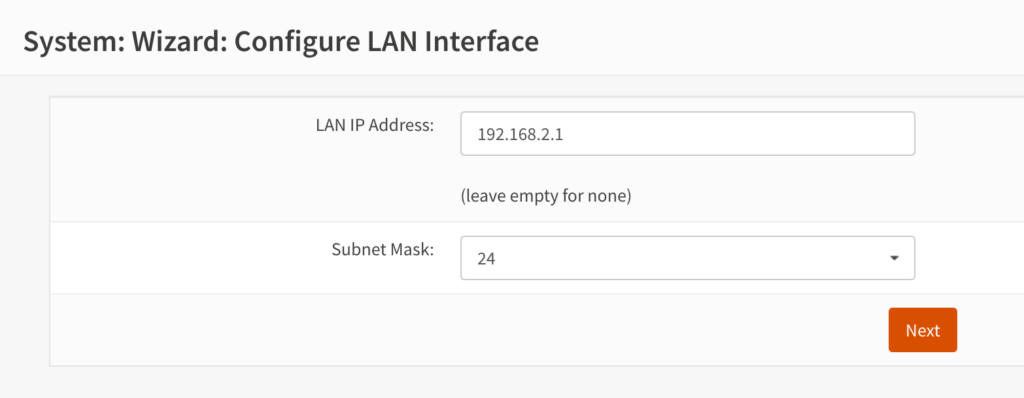
    OPNsense wizard page with options for configuring the LAN interface
    LAN interface configuration

    In this page, I configured the LAN interface address to be the same as what I had in the previous setup. In the following page, I configured the root password and completed the wizard to apply the configured changes. With this setup, I had a working router between my LAN and the load balancer.

    Since the metal top of the mini PC’s case acts as a passive heat sink, I could feel it getting very hot even though the OPNsense thermal sensors showed a low, static temperature. I will monitor this in the coming days to make sure that there are no thermal issues.

    I still had to configure the firewall to force redirect all outgoing DNS requests to the local Pi-hole server, the details of which I will share in the next blog post β€” Redirect all outgoing DNS requests to the local Pi-hole instance using OPNsense.

    Fediverse Reactions
    January 20, 2025
  • Automatically delete the trailing whitespace on save in emacs while excluding the trailing newlines

    I use emacs as my editor and have it configured to delete all trailing whitespace in a file, including any trailing newlines at the end, before saving it. The configuration snippet that I have in my emacs configuration file to do this is

    (add-hook 'before-save-hook 'delete-trailing-whitespace)

    While this is very convenient and works as expected, it becomes a hindrance in specific cases – the Jinja2 templating language deletes a single trailing newline, thereby leaving the rendered templates without a newline at the end.

    One way to work around this behaviour is to add 2 trailing newlines in the jinja2 template files. But unfortunately, due to my emacs configuration that deletes all trailing whitespace, this doesn’t work. So I started reading the documentation for the delete-trailing-whitespace function and found out about the delete-trailing-newlines variable (default: t). This variable controls whether the trailing newline characters at the end of a file are deleted or not. So I wanted to try overriding the delete-trailing-newlines variable to be false in jinja2-mode, that I use for editing Jinja2 templates.

    With some help from the excellent folks in the #emacs IRC channel on Libera Chat, I was able to come up with the following configuration, that works as expected.

    (use-package jinja2-mode                                                                     
      :pin nongnu                                                                                
      :hook                                                                                      
      (jinja2-mode . (lambda ()                                                                  
                       (setq-local delete-trailing-lines nil)))                                  
      :mode "\\.j2\\'")
    

    Note that I use the excellent use-package macro to install the jinja2-mode and configure it appropriately. If you don’t use use-package, this can be done using the add-hook function.

    June 12, 2023
  • Turbocharge your Firefox containers using the Containerise add-on

    The Firefox multi-account container add-on is very useful for creating isolated containers for various sites and groups of sites. I use it every day and love it. The add-on provides a simple way to map certain domains to always open in specific containers. This is useful, but it doesn’t work well when sites use the same domain for multiple web applications that you want to isolate. Google, for example, does this and hosts Google search and Google maps on the same domain, and the add-on will open both of them in the same container, without a way to separate them.

    Here’s where the Containerise add-on comes handy. It supports mapping URLs to specific containers using glob and regex patterns. Using this, I can add the following glob pattern for my Google container in the ‘Containerise’ add-on to isolate all Google searches to the Google container.

    !https://www.google.com/search*

    This is useful to prevent my Google searches from being directly linked to my Google account logged in another container or outside the containers.

    May 24, 2023
  • Replacing the Netspeed Widget on Kubuntu 22.04 and newer

    I have been using the Netspeed widget on my KDE Plasma installations for a long time to display the network download and upload speed in the Plasma panel. When I upgraded to Kubuntu 22.04 a few months ago, I found that it stopped working. After doing some research, I found that the KSysGuard package that the widget depends on has been removed from the Debian and Ubuntu repositories as it is unmaintained (Debian bug).

    Thanks to a useful suggestion on Reddit, I was able to recreate the functionality of this widget using the System Monitor Sensor widget. Here is what I did to achieve it.

    • Add the System Monitor Sensor widget to the panel.
    • Right-click the widget and click on the Configure System Monitor Sensor option in the menu
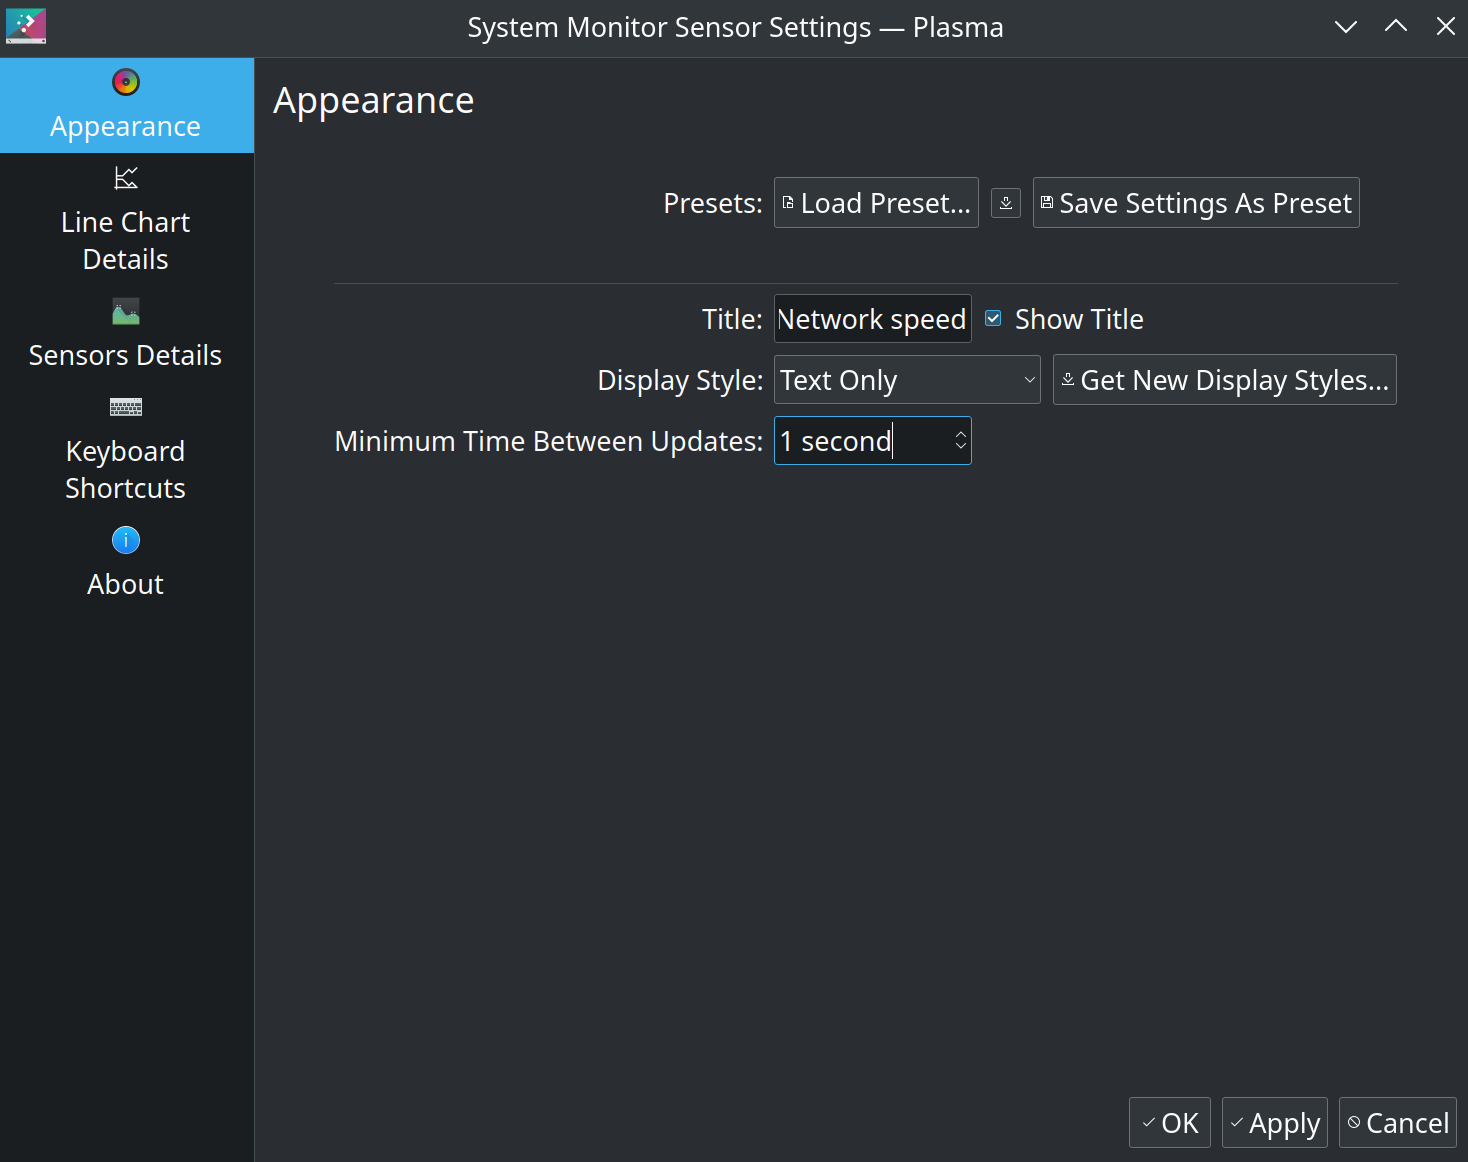
    • In the Appearance tab, load the Network speed preset, set the Display style to Text Only and set the Minimum Time Between Updates to 1 second. Apply the changes before proceeding to the next step.System Monitor Sensor widget appearance tab settings
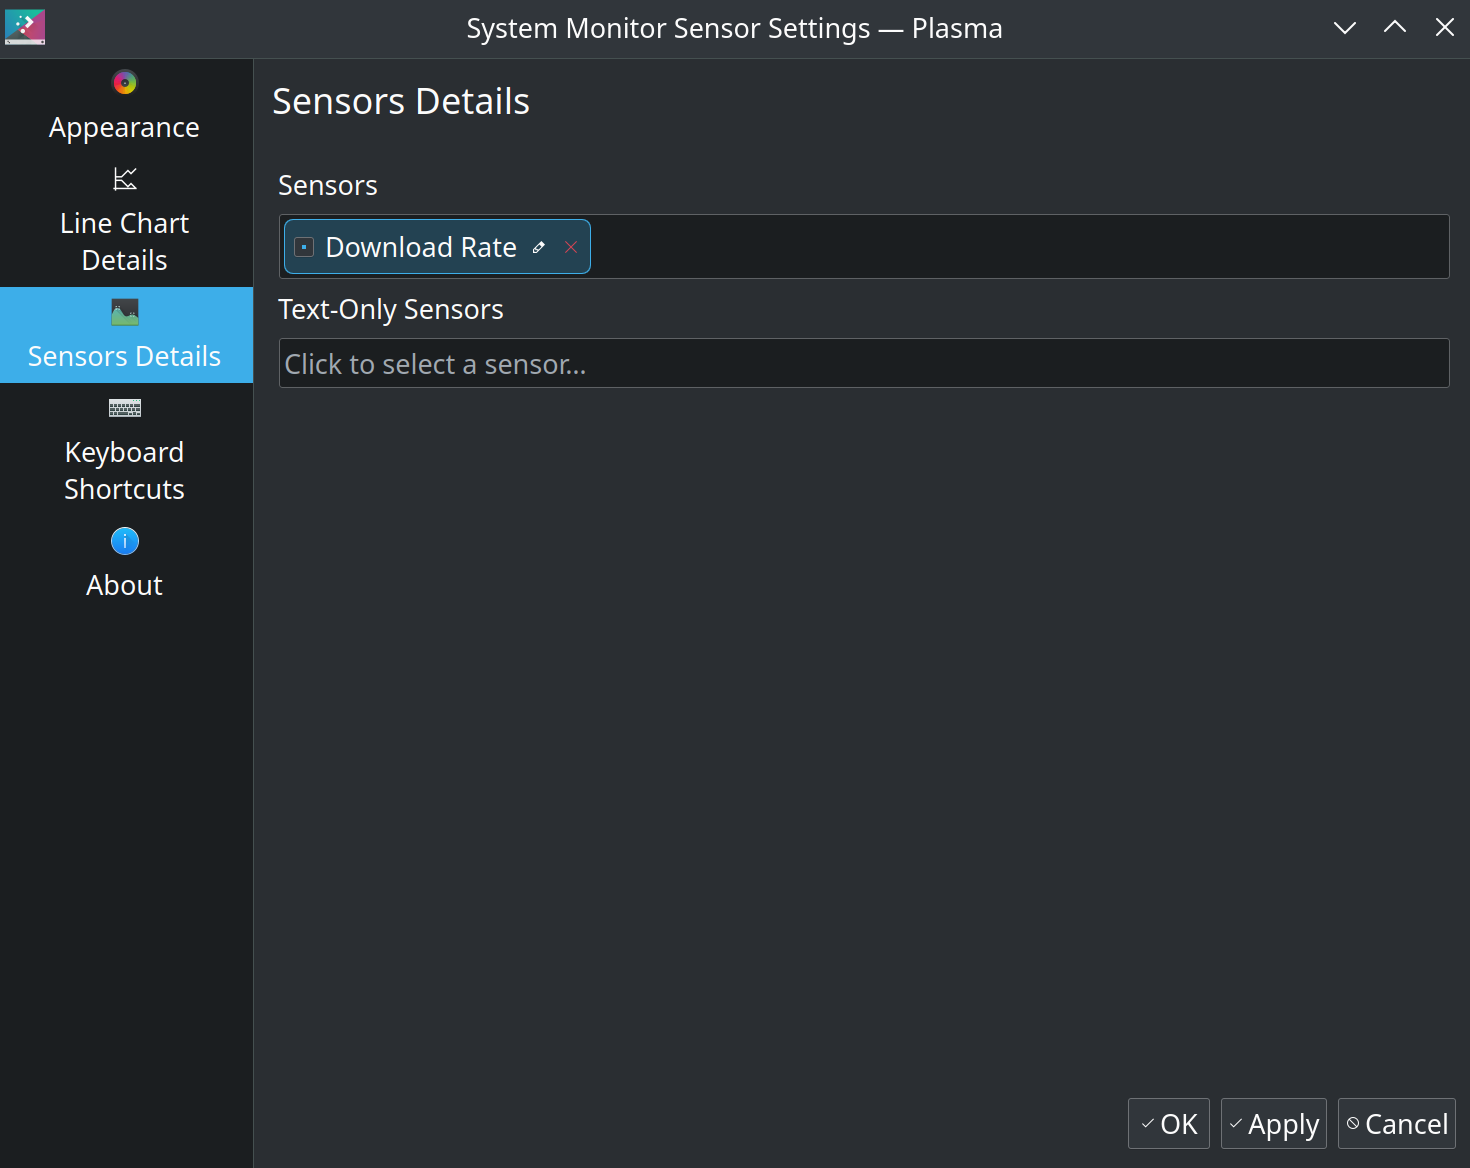
    • Open the Sensors Details tab and in the Text Only Sensors field, search for the Download Rate sensor. I chose the Download Rate (B/s) version. There is also a Download Rate (b/s) sensor, if you prefer that.System Monitor Sensor widget Sensors Details tab
    • Click on the small pencil icon edit button just after the name of the widget, Download Rate, to edit it. Specify the down arrow symbol, ↓, as the name. Apply the changes.
    • Now you have a widget that shows the current download speed on the panel, updated once every second.
    • Add another System Monitor Sensor widget to the panel and configure it to display the Upload Rate by following the steps above, tweaked for displaying the upload rate.
    • The result of doing these steps should look like what is shown in the screenshot below.Download and upload speed widgets on the Plasma panel

    With this, I have a good replacement for the NetSpeed Widget on my Kubuntu install.

    January 19, 2023
  • Ubuntu 22.04 desktop installation guide btrfs-luks full disk encryption including /boot

    I am a big fan of Willi Mutschler‘s btrfs-luks full disk encryption installation guides on his site, https://mutschler.dev, and have used them for installing Manjaro and Ubuntu 20.04 and newer versions. Recently, I set up Kubuntu 22.04 full disk encryption by following the same guide and noticed a couple of changes that had to be done to get it working. So I am documenting those here till he writes a new guide for Ubuntu 22.04. πŸ™‚

    In the step 3 of his excellent guide, the optimized mount options for SSD and NVMe drives are listed. The space_cache option mentioned in that section no longer works on Ubuntu 22.04 because the option has been renamed in the newer versions of the Linux kernel. So one has to specify the option as space_cache=v2. Otherwise, the Ubiquity installer will crash, and the installation will fail.

    Also, in the Install the EFI bootloader section, it is a good idea to use the HWE Linux kernel package names corresponding to 22.04 instead of 20.04 since the packages containing the old LTS version in their name are ‘dummy transitional packages’. So the corresponding command can to be updated to

    apt install -y --reinstall grub-efi-amd64-signed linux-generic linux-headers-generic linux-generic-hwe-22.04 linux-headers-generic-hwe-22.04

    At the time of writing this post, the HWE package installs the same kernel version as the one that shipped with Ubuntu 22.04 since there isn’t a newer kernel released yet – these are usually backported from newer LTS versions.

    With these minor changes, it should be possible to follow the steps in that documentation to set up full disk encryption with btrfs and luks on Ubuntu 22.04.

    As a bonus, I have used the same guide for installing Kubuntu 20.04, 21.10 and 22.04, with appropriate substitutions, wherever needed.

    I have usually skipped the last section in this guide, Install Timeshift, timeshift-autosnap-apt and grub-btrfs, in favour of using my tools of choice to do the same – Snapper and snapper-gui, both of which are available in the official Ubuntu repositories. I will write a blog post about it in the future. 🀞

    January 18, 2023
  • ActivityPub integration

    This blog now integrates with the Fediverse using the ActivityPub protocol. This means that you can follow this blog by searching for lguruprasad@www.lguruprasad.in and following that account from any of the supported platforms mentioned here! πŸŽ‰

    February 20, 2022
  • How I set up my self-hosted Matrix instance

    Matrix is a modern, decentralized, federated real-time communication protocol and open standard. It has a thriving ecosystem of servers, clients, and applications. Synapse is the reference server and Element is the reference client for the web, desktop and mobile platforms.

    Matrix protocol logo

    This is something that I have been interested in using and self-hosting for a few years now. I have had an account on the main matrix.org instance for a while now and wanted to switch to a self-hosted instance.

    Since I have been using docker, docker-compose, and Ansible to deploy and run a wide range of self-hosted applications for my personal use, the spantaleev/matrix-docker-ansible-deploy was my choice for setting up my instance. I chose to use Synapse over Dendrite, the second-generation server because though it is lightweight, it is not feature-complete. All the other third-party implementations have a lot of catching up to do as well, at the time of writing this post.

    I learned a bit of Terraform in my previous job, but never had a chance to learn it properly or build something from scratch using it. So armed with my little knowledge of Terraform, I created a small Terraform project to automate setting up a new Matrix instance. It provisions the DNS records needed for Matrix on Namecheap β€” my domain registrar and DNS host, provisions an appropriately sized Hetzner cloud instance with a floating IP address, and runs the deployment playbook in the matrix-docker-ansible-deploy repository with the provided Ansible variables file. I used the hcloud and the namecheap Terraform providers to do this.

    With this, I was able to provision and set up my Matrix instance in under 10 minutes by just running

    $ terraform plan -out=matrix-plan
    $ terraform apply "matrix-plan"

    I have released the source code for this project here on GitLab under the GNU Affero General Public License v3.0 (AGPLv3) or later. Since this project contains the matrix-docker-ansible-deploy repository as a git submodule, running git submodule update --init should automatically pull in a known good commit of that repository to use for the deployment. The README file has the instructions for using the project to set Matrix instances from scratch.

    I hope it is useful for those who are looking to set up a new Matrix instance.

    February 19, 2022
  • Move windows between displays using shortcuts in KDE Plasma

    I have a dual-display setup for my desktop and I usually set up custom keyboard shortcuts in KDE Plasma to allow moving windows between the displays easily. However, the KWin shortcuts section of the Plasma System Settings app has multiple shortcuts named in a confusingly similar way.

    So I am writing this post to just document what I did to get my custom Ctrl +Alt + <left/right> arrow shortcut working.

    Set up custom shortcuts for the Window to Previous Screen and the Window to Next Screen entries to get this working. As mentioned above, I use Ctrl + Alt + <left arrow> for the former and Ctrl + Alt + <right arrow> for the latter.

    Screenshot showing the shortcut entries to change.

    December 19, 2021
  • Updating a docker-based Wireguard server when connected to it remotely via the same VPN

    I have a WireGuard server running on a Raspberry Pi 4B at my home, exposed to the internet via a static IP address and port forwarding. I set it up using the Linuxserver.io WireGuard docker container, which is straightforward to use and manage.

    As I am in a different city now, I had been postponing the updates to the docker container since it is risky to do so remotely. Any issue in the upgrade process could lock me out of my home network till I am physically present in my home.

    As I hate deferring updates, I decided to apply the update remotely. To prepare for that, I logged into the Raspberry Pi via the WireGuard VPN and set up a remote forwarding SSH tunnel on a server of mine hosted in the cloud, using a command like,

    $ ssh -R 2222:127.0.0.1:22 username@remote.server.address -N

    This command forwards the 2222 port on the remote server to 127.0.0.1:22 on the Raspberry Pi, thereby allowing access to it from the remote server. The -N flag prevents the execution of any remote command (like say, starting the user’s shell) and is useful for just forwarding ports.

    Then I logged in directly to that server and logged in to the Raspberry Pi using the forwarded port on that server. Now I could destroy and re-create the WireGuard container without the fear of being locked out since I was connected to the device using SSH and not the WireGuard VPN itself. So, I ran the following command.

    $ ssh -p2222 -o UserKnownHostsFile=/dev/null -o StrictHostKeyChecking=no -o CheckHostIP=no username@127.0.0.1

    The UserKnownHostsfile=/dev/null option prevents the saving of the remote host’s SSH key in the ~/.ssh/known_hosts file, the StrictHostKeyChecking=no option prevents the checking of the remote host key, and the CheckHostIP=no option prevents the checking of the remote host’s IP address. These options disable a lot of important security measures that SSH provides by default ⚠️. But since we are connecting to a known host through a forwarded host, and don’t want to save any local data about it, these options are fine to use.

    This command my remote SSH session, and I was worried that I had missed something important and was locked out. So, I disconnected the SSH session using the escape sequence (<enter>~.) and reconnected to my cloud server and then to the Raspberry Pi. It worked and I heaved a sigh of relief and was glad to have pulled this off without any issues. I verified that updated WireGuard container was running without any issues and that I was able to connect to the VPN. 😌

    July 15, 2021
1 2 3
Next Page→

The Midnight Sun

I think therefore I am

  • Blog
  • About
  • FAQs
  • Authors
  • Events
  • Shop
  • Patterns
  • Themes

Twenty Twenty-Five

Designed with WordPress